F5 BIG-IP APM (Access Policy Manager)のExplicit Forward Proxyの検証構成を作成した際のメモ書きです。
本記事ではExplicit Forward Proxyの基本的な設定を行います。
本記事は下記の No.01 の記事をベースとしています。
本手順ではAPMの機能を利用していないため、APMが無効化されている状態でも動作します。 ですが、本内容を発展させて柔軟なアクセス制御を行うにはAPMが必要になる点は留意が必要です。
目次
- 目次
- 概要
- 参考情報に関して
- 検証構成
- 検証時の情報
- 設定方針
- 環境依存の設定
- 変数に関して
- HTTP Forward Proxy向けの設定
- SSL Forward Proxy向けの設定
- 最後に
- 更新履歴
概要
Explicit Forward Proxy構成で構築するにあたって本手順では、大まかに下記の2つの設定を行います。
HTTP Forward Proxy向けの設定
Explicit Forward Proxyの基本形になります。SSL Forward Proxy向けの設定
SSL通信のインターセプトを行い、SSL通信を復号化して中身を検査可能にします。
参考情報に関して
- 下記の記事を参考にして、筆者環境に合わせて読み替えております。
Use F5 LTM as HTTP Proxy DevCentral
https://devcentral.f5.com/s/articles/use-f5-ltm-as-http-proxy-1145
Explicit Forward Proxy構成の設定内容が簡潔にまとまっているため一度は目を通すのをオススメします。
なお、本記事ではバージョン差異によるパラメータの一部修正と、拡張性を考慮して一部手順の変更を行っております。
APMのドキュメント
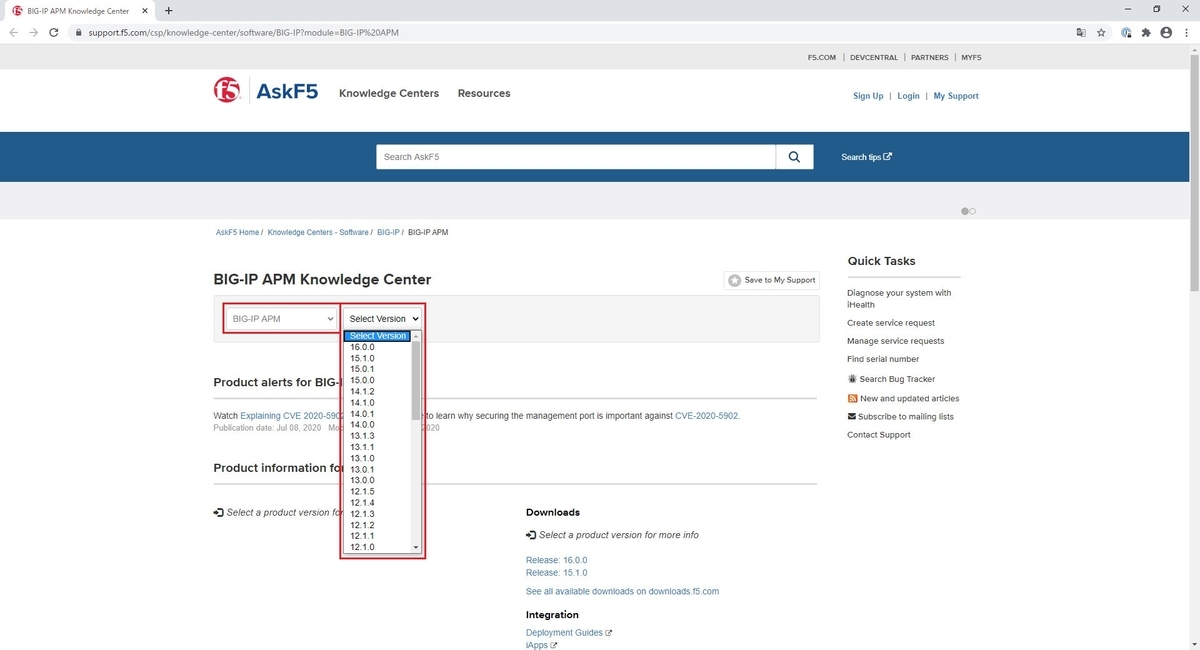
BIG-IP APM Knowledge Center
https://support.f5.com/csp/knowledge-center/software/BIG-IP?module=BIG-IP%20APMAPMのモジュールがすでに選択されているので、バージョンを適宜選択します。
BIG-IP APM Knowledge Center APMの中でもSWG (Secure Web Gateway)に関連するドキュメント (Version. 15.1.0向け)
AskF5 | Manual: BIG-IP Access Policy Manager: Secure Web Gateway
https://techdocs.f5.com/en-us/bigip-15-1-0/big-ip-access-policy-manager-secure-web-gateway.htmlSWGの中でもExplicit Forward Proxyに関連するドキュメント (Version. 15.1.0向け)
AskF5 | Manual Chapter: Explicit Forward Proxy Configuration
https://techdocs.f5.com/en-us/bigip-15-1-0/big-ip-access-policy-manager-secure-web-gateway/explicit-forward-proxy-configuration.html#GUID-83FD235F-507A-4754-8640-F3CF629F5E7C
検証構成

検証時の情報
- F5 BIG-IP Virtual Edition Version 15.1.0
Trial LicenseではSWG(Secure Web Gateway)とSSLO(SSL Orchestrator)は使用できないため無効化の状態です。
VMware vSphere ESXi 7.0 上に仮想マシンをデプロイしています。 - Microsoft Windows Server 2019 Datacenter Edition
- Microsoft Windows 10 Enterprise Edition
設定方針
- CLIでの設定方法をメインとして、参考情報としてWeb UI (GUI)のキャプチャを掲載しています。
- スクリーンショットは CLI で作成後に確認した際のものになります。
- 設定変更の事前と事後で基本的には確認を行う手順にしております。
環境依存の設定
環境に合わせて適宜読み替えが必要になる箇所を下記の表にまとめました。
| 設定項目 | 設定値 | 備考 |
|---|---|---|
| DNS Resolver | 1.1.1.1 | CloudFlareのPublic DNS |
| Virtual ServerのIPアドレス | 192.0.2.211 | |
| Virtual Serverの待ち受けポート番号 | 8080 |
変数に関して
BIG-IPのShellは下記のように bash であり、bashの変数を活用した手順となっています。
[root@bigip01:Active:Standalone] config # echo $SHELL
/bin/bash
[root@bigip01:Active:Standalone] config #
HTTP Forward Proxy向けの設定
HTTP Forward Proxy向けの変数の設定
変数の定義
HTTPBaseName="HTTP_FORWARD_PROXY"
VS_IP="192.0.2.211"
VS_PORT="8080"
変数の値の確認
echo $HTTPBaseName
echo $VS_IP
echo $VS_PORT
DNS Resolverの設定
tmsh list net dns-resolver

tmsh create net dns-resolver RESOLVER_${HTTPBaseName} { forward-zones replace-all-with { . { nameservers replace-all-with { 1.1.1.1:domain { } } } } route-domain 0 }

tmsh list net dns-resolver
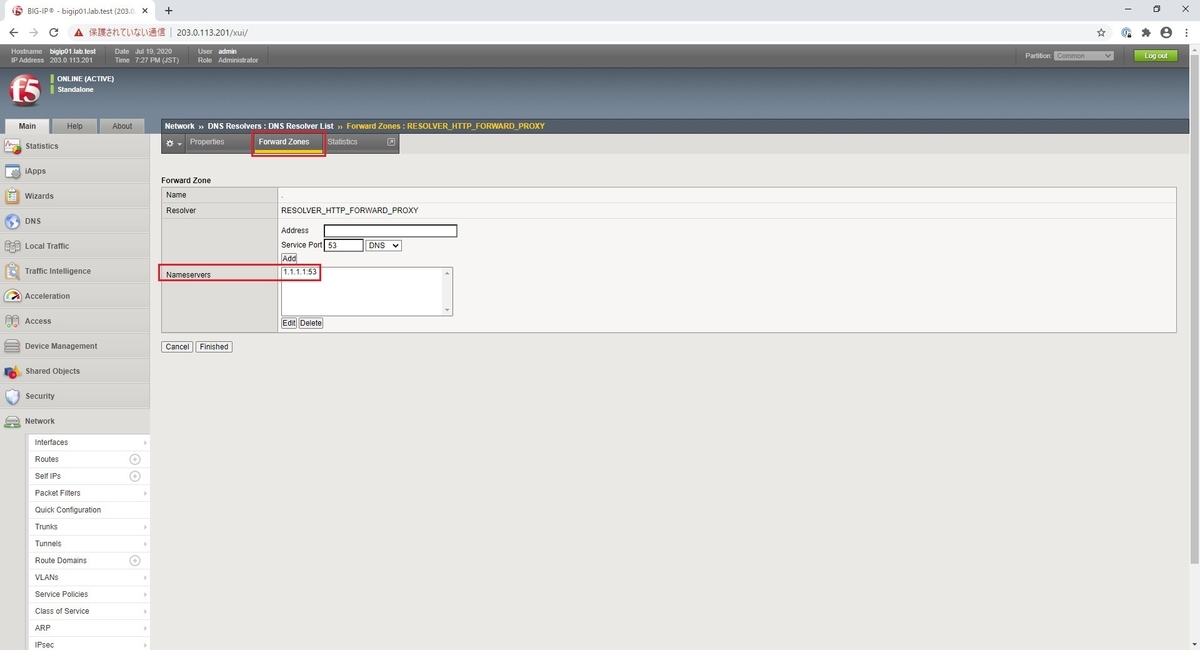
Web UI
Web UI では Network > DNS Resolvers より下記の表の設定に相当します。


http-tunnel (tcp-forard)の設定
SSL FORWARD PROXY向けのVirtual Serverを用途別に複数作成する場合に http-tunnel (tcp-forard) を分ける必要があるため、デフォルトとは別に作成しています。
tmsh list net tunnels

tmsh create net tunnels tunnel http-tunnel_${HTTPBaseName} { profile tcp-forward }

tmsh list net tunnels
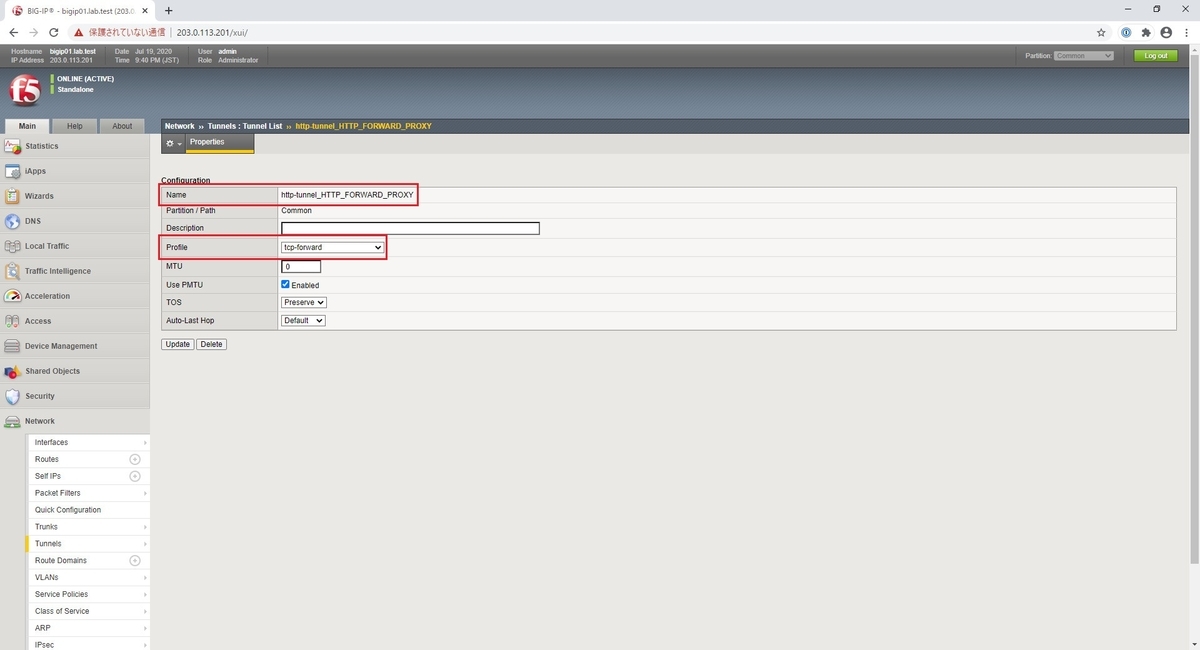
Web UI
Web UI では Network > Tunnels より下記の表の設定に相当します。設定項目 設定値 備考 Name http-tunnel_HTTP_FORWARD_PROXY Profileの種別は tcp-forward になりますが、デフォルトで存在する http-tunnel を意識した名称としています。 Profile tcp-forward
HTTP Profileの設定
tmsh list ltm profile http

tmsh create ltm profile http http_${HTTPBaseName} {  defaults-from http-explicit explicit-proxy { default-connect-handling allow dns-resolver RESOLVER_${HTTPBaseName} tunnel-name http-tunnel_${HTTPBaseName} } proxy-type explicit }

tmsh list ltm profile http
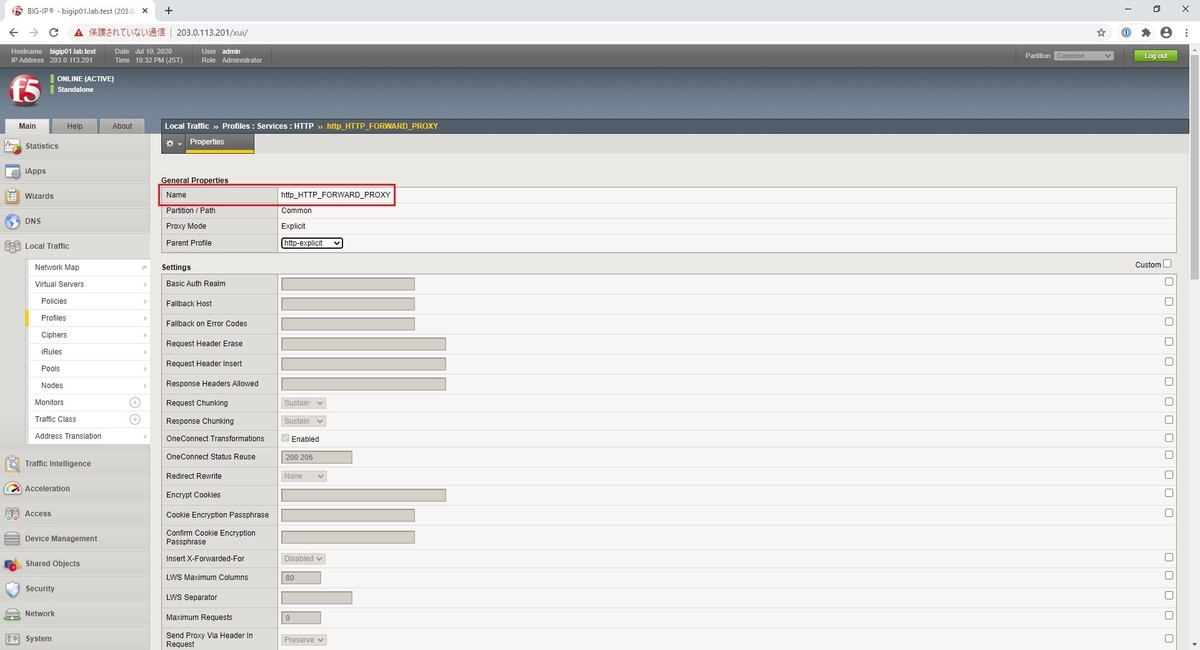
Web UI
Web UI では Local Traffic > Profiles > Services > HTTP より下記の表の設定に相当します。設定項目 設定値 備考 Name http_HTTP_FORWARD_PROXY Proxy Mode Explicit Explicit Forward Proxyのため Explicit を指定します。 Parent Profile http-explicit DNS Resolver RESOLVER_HTTP_FORWARD_PROXY 先に作成済みの DNS Resolver を指定します。 Default Connect Handling Allow Tunnel Name http-tunnel_HTTP_FORWARD_PROXY 先に作成済みの http-tunnel (tcp-forard) を指定します。 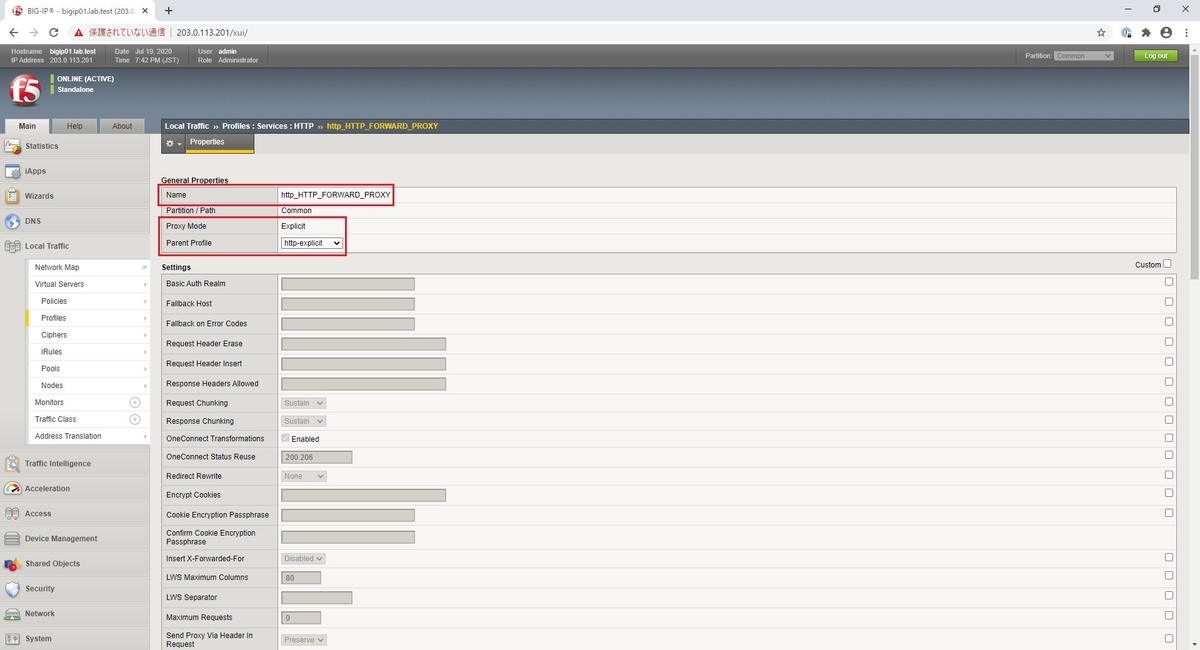
HTTP Profile #1 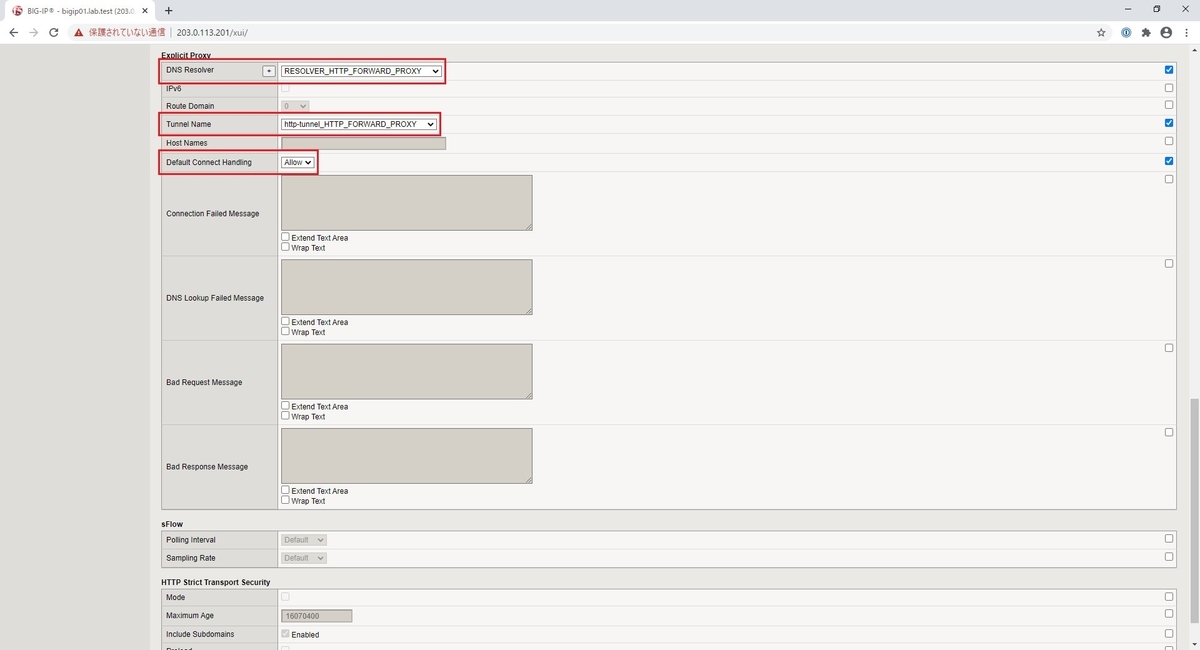
HTTP Profile #2 Default Connect Handling に関して
Explicit Forward Proxyの構成では、HTTPS接続時にHTTP CONNECT Methodを用います。
その制御に関わるのが Default Connect Handling となっています。
Deny だと他のVirtual Serverが処理する前提で HTTP CONNECT Method を受け付ける挙動になっているようです。
そのため、HTTP接続は行えるがHTTPS接続は行えない場合は、本設定の影響を受けている可能性があります。なお、SSL Forward Proxy向けのVirtual Serverを設定する際は改めて Deny にします。
詳細な説明に関しては下記のドキュメントに記載があります。
ltm profile http
https://clouddocs.f5.com/cli/tmsh-reference/v15/modules/ltm/ltm_profile_http.html#:~:text=default-connect-handlingAskF5 | Manual Chapter: Services Profiles
https://techdocs.f5.com/en-us/bigip-15-1-0/big-ip-local-traffic-management-profiles-reference/services-profiles.html#:~:text=Default%20Connect%20Handling
HTTP Proxy向けVirtual Serverの作成
tmsh list ltm virtual

tmsh create ltm virtual VS_${HTTPBaseName} { destination ${VS_IP}:${VS_PORT} ip-protocol tcp mask 255.255.255.255 profiles replace-all-with { http_${HTTPBaseName} { } tcp } source 0.0.0.0/0 source-address-translation { type automap } translate-address enabled translate-port enabled}

tmsh list ltm virtual
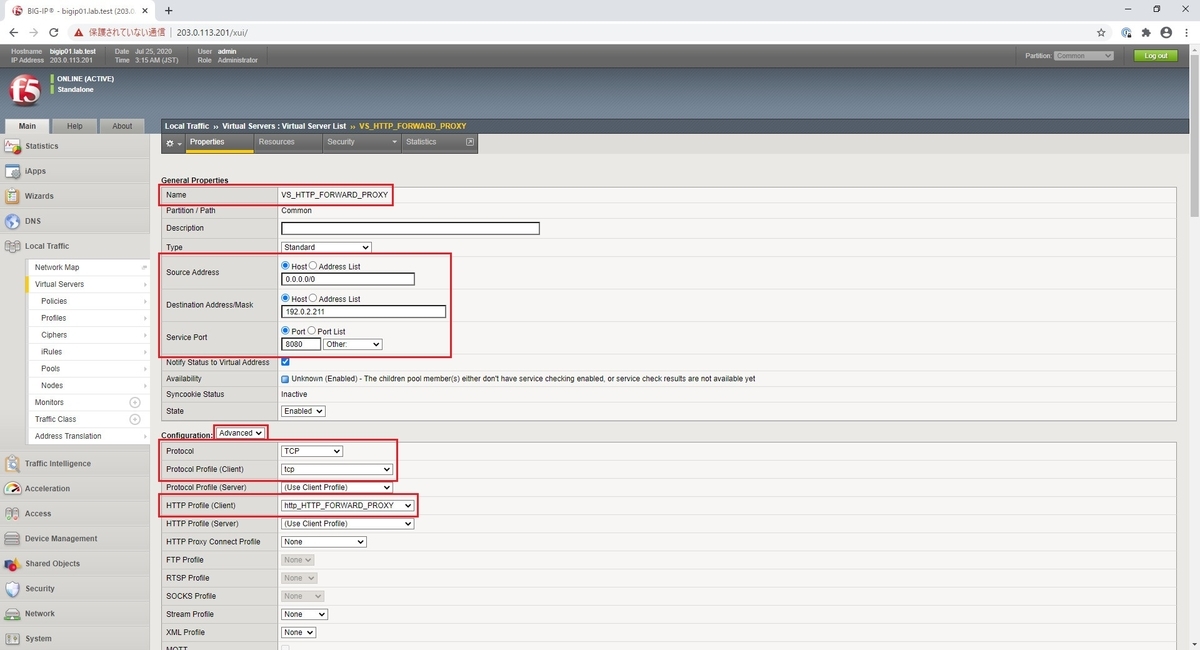
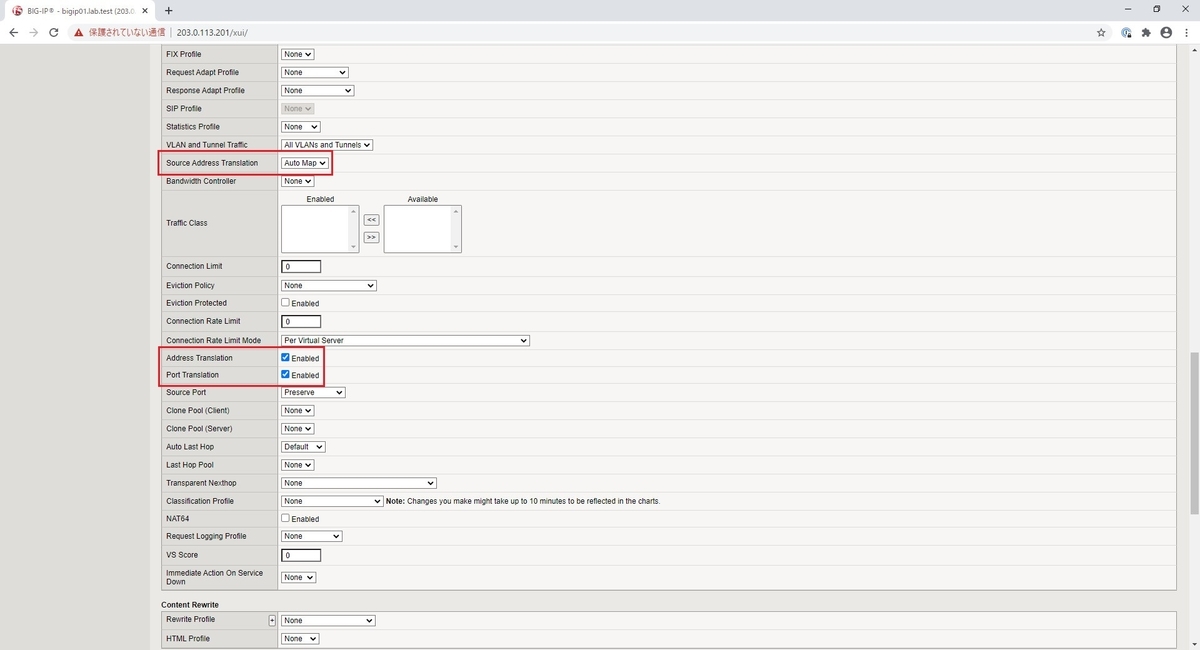
Web UI Web UI では Local Traffic > Virtual Servers より下記の表の設定に相当します。
設定項目 設定値 備考 Name VS_HTTP_FORWARD_PROXY Source Address Host - 0.0.0.0/0 Destination Adddress/Mask Host - 192.0.2.211 Explicit Forward Proxyの待ち受けIPアドレス Service Port Port - 8080 Explicit Forward Proxyの待ち受けポート番号 Protocol TCP Protocol Proofile (Client) tcp HTTP Profile (Client) http_HTTP_FORWARD_PROXY Souce Address Translation Auto Map Address Translation Enabled (チェックを入れる。) Port Translation Enabled (チェックを入れる。)
HTTP Forward Proxyの疎通確認
HTTPとHTTPSで疎通確認を行います。
BIG-IP自身から接続確認を行う場合は、bashの変数を活用して下記のように curl コマンドで疎通確認を行います。
VS_IP="192.0.2.211"
VS_PORT="8080"

echo $VS_IP
echo $VS_PORT

curl --verbose --proxy ${VS_IP}:${VS_PORT} http://www.example.com

curl --verbose --proxy ${VS_IP}:${VS_PORT} https://www.example.com
HTTP Forward Proxyのみの設定の場合は、BIG-IPがSSL通信のインターセプトを行わないためSSL証明書に関するエラーが出ないのがポイントです。
設定の保存
HTTP Forward Proxyの疎通確認まで行えた段階で、適宜、CLIから操作したメモリ上の設定内容をファイルに書き込みます。
tmsh save sys config partitions all
SSL Forward Proxy向けの設定
SSL通信のインターセプトを行うためのVirtual Serverの作成手順となります。
挙動としては、HTTP Forward ProxyのVirtual Serverで受けた通信の中で、HTTP CONNECT MethodによるHTTPS接続に反応するVirtual Serverとなっています。
そのため、先のHTTP Forward Proxyの設定がされているのが前提となります。
SSL Forward Proxy向けの変数の設定
変数の定義
SSLBaseName="SSL_FORWARD_PROXY"
dirname="/var/tmp"
CASubject="/C=JP/O=DEMO\ COMPANY/CN=SSL\ FORWARD\ PROXY\ CA"
変数の値の確認
echo $SSLBaseName
echo $dirname
echo $CASubject
自己署名CA証明書の作成
openssl genrsa -out ${dirname}/${SSLBaseName}.key 4094

openssl req -sha512 -new -x509 -days 3650 -key ${dirname}/${SSLBaseName}.key -out ${dirname}/${SSLBaseName}.crt -subj "${CASubject}"
自己署名CA証明のインポート
tmsh list sys crypto key

tmsh install sys crypto key ${SSLBaseName}.key from-local-file ${dirname}/${SSLBaseName}.key

tmsh list sys crypto key


tmsh list sys crypto cert

tmsh install sys crypto cert ${SSLBaseName}.crt from-local-file ${dirname}/${SSLBaseName}.crt

tmsh list sys crypto cert
SSL Profileの設定
SSL Client Profileの proxy-ca-cert, proxy-ca-key が deprecated なパラメータのため書き換えています。
[root@bigip01:Active:Standalone] config # tmsh create ltm profile client-ssl clientssl_${SSLB
aseName} { cert-lookup-by-ipaddr-port disabled defaults-from clientssl mode enabled proxy-ca-cert ${SSLBaseName}.crt proxy-ca-key ${SSLBaseName}.key ssl-forward-proxy enabled }
[api-status-warning] ltm/profile/client-ssl, properties : deprecated : proxy-ca-cert, proxy-ca-key
[root@bigip01:Active:Standalone] config #
[root@bigip01:Active:Standalone] config # tmsh show sys version

Sys::Version
Main Package
  Product     BIG-IP
  Version     15.1.0.3
  Build       0.0.12
  Edition     Point Release 3
  Date        Tue Apr 28 22:27:02 PDT 2020

[root@bigip01:Active:Standalone] config #
パラメータの書き換え後のコマンドは下記の通りです。
tmsh list ltm profile client-ssl

tmsh create ltm profile client-ssl clientssl_${SSLBaseName} { cert-lookup-by-ipaddr-port disabled defaults-from clientssl mode enabled cert-key-chain add { ${SSLBaseName} { cert ${SSLBaseName}.crt key ${SSLBaseName}.key usage CA } } ssl-forward-proxy enabled }

tmsh list ltm profile client-ssl


tmsh list ltm profile server-ssl

tmsh create ltm profile server-ssl serverssl_${SSLBaseName} { defaults-from serverssl ssl-forward-proxy enabled }

tmsh list ltm profile server-ssl
- Web UI
SSL Client Profile
Web UI では Local Traffic > Profiles > SSL > Client より下記の表の設定に相当します。設定項目 設定値 備考 Name clientssl_SSL_FORWARD_PROXY Parent Profile clientssl SSL Forward Proxy enabled CA Certificate Key Chain Certificate: SSL_FORWARD_PROXY.crt , Key: SSL_FORWARD_PROXY.key 先に作成済みの 自己署名CA証明書 を指定します。 Cache Certificate by Addr-Port Uncheck (チェックを外す。) 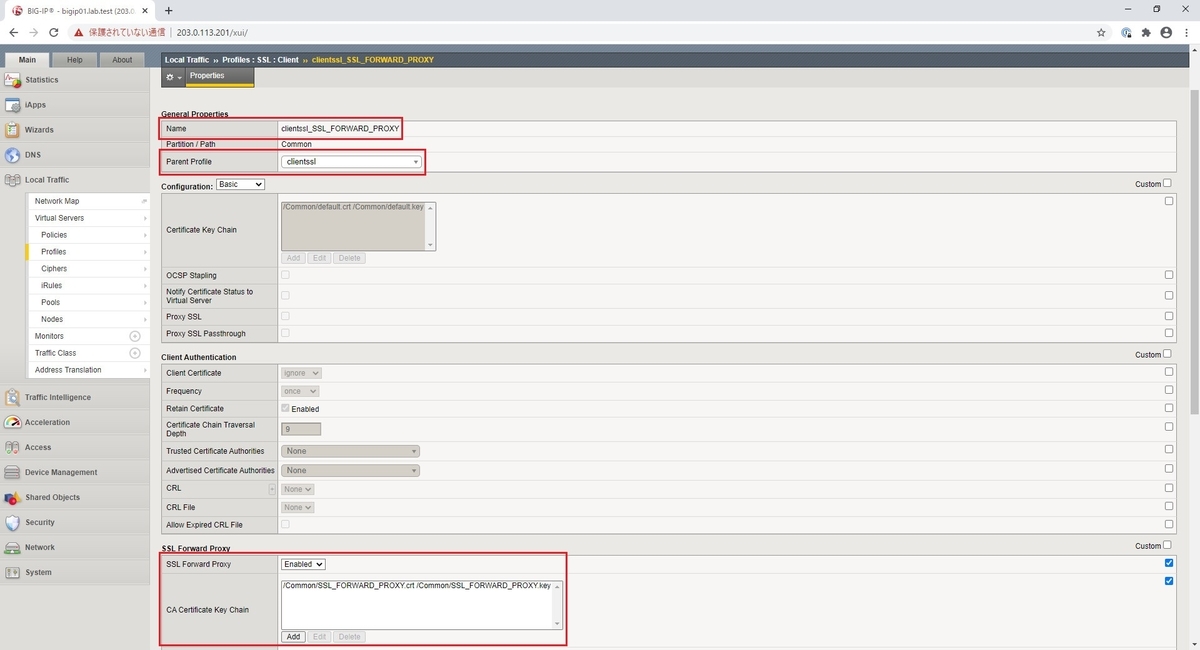
SSL Client Profile #1 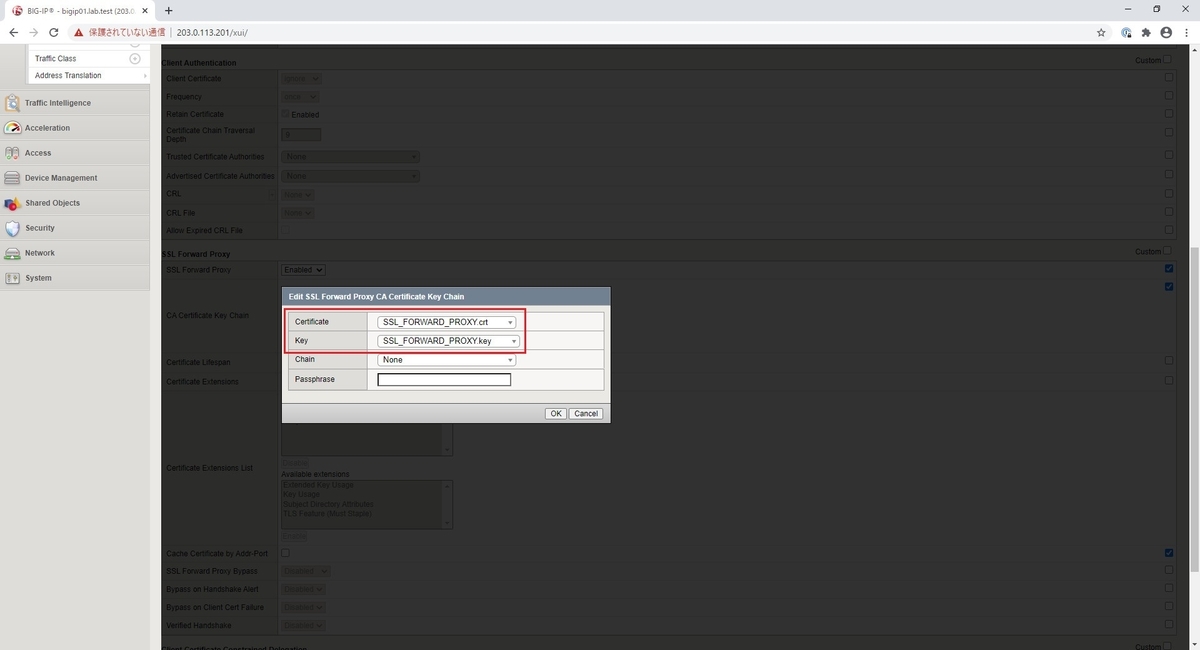
SSL Client Profile #2 
SSL Client Profile #3 SSL Server Profile
Web UI では Local Traffic > Profiles > SSL > Server より下記の表の設定に相当します。設定項目 設定値 備考 Name serverssl_SSL_FORWARD_PROXY Parent Profile serverssl SSL Forward Proxy enabled 
SSL Server Profile
SSL Forward Proxy向けVirtual Serverの設定
tmsh list ltm virtual

tmsh create ltm virtual VS_${SSLBaseName} { destination 0.0.0.0:any ip-protocol tcp profiles replace-all-with { clientssl_${SSLBaseName} { context clientside } serverssl_${SSLBaseName} { context serverside } http { } tcp { } } source 0.0.0.0/0 translate-address disabled translate-port disabled vlans replace-all-with  { http-tunnel_${HTTPBaseName} } vlans-enabled }

tmsh list ltm virtual
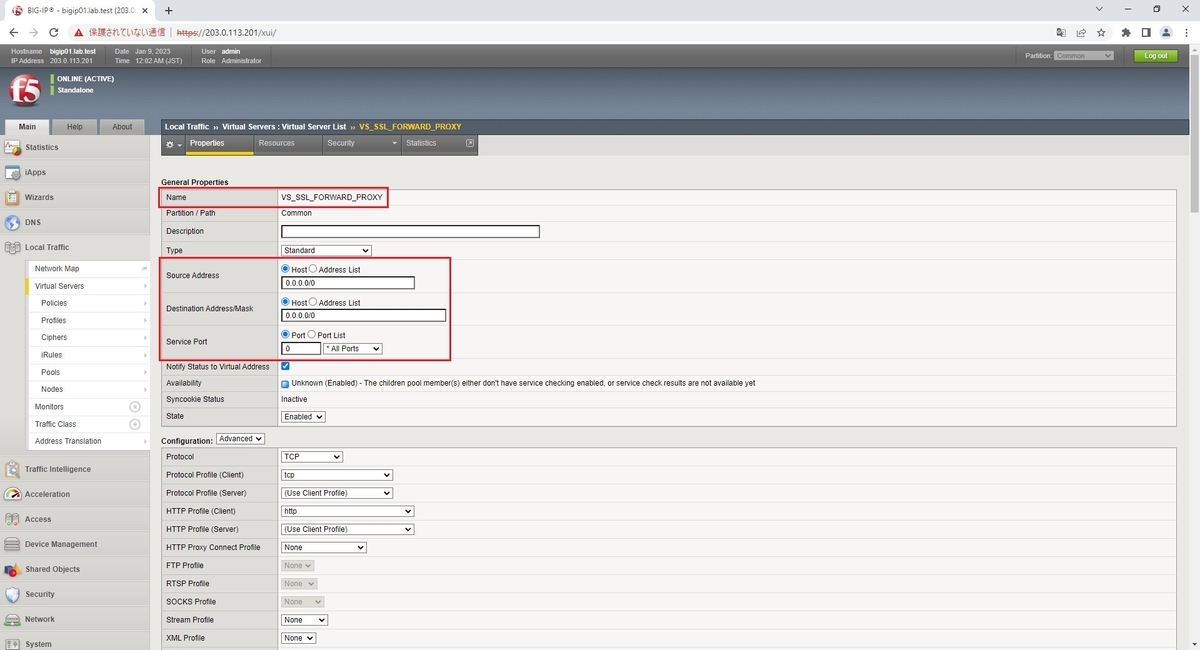
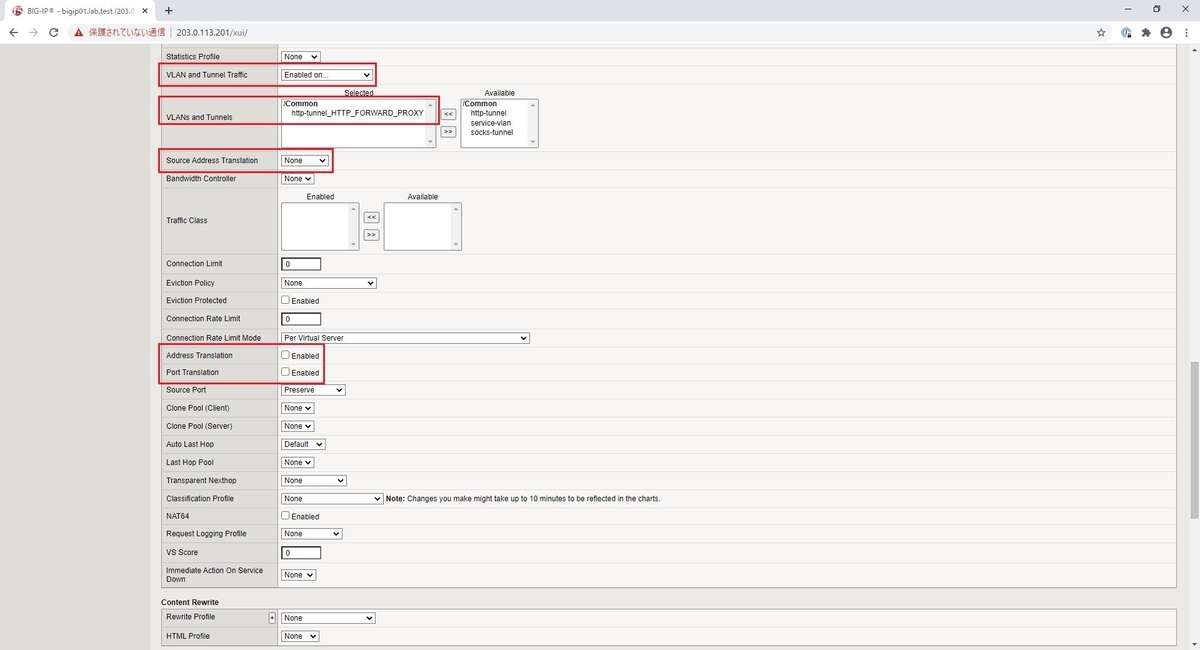
Web UI
Web UI では Local Traffic > Virtual Servers より下記の表の設定に相当します。設定項目 設定値 備考 Name VS_SSL_FORWARD_PROXY Source Address Host - 0.0.0.0/0 Destination Adddress/Mask Host - 0.0.0.0/0 HTTP CONNECT Methodによる不特定多数の接続先にマッチさせるために Any(.0.0.0/0) な値を指定します。 Service Port Port - 0 (* All Ports) HTTPSのWell-knownポートを指定します。 Protocol TCP HTTP Profile (Client ) http SSL Profile (Client) clientssl_SSL_FORWARD_PROXY 先に作成済みの SSL Client Profile を指定します。 SSL_Profile (Server) serverssl_SSL_FORWARD_PROXY 先に作成済みの SSL Server Profile を指定します。 VALN and Tunnel Traffic Enabled on... VLAN and Tunnels http-tunnel_HTTP_FORWARD_PROXY HTTP Forward Proxy向けVirtual ServerのHTTP Profileに紐づく http-tunnel (tcp-forward) を指定します。 Source Address Translation None Address Translation Uncheck (チェックを外す。) Port Translation Uncheck (チェックを外す。)

Default Connect Handlingの無効化
tmsh list ltm profile http

tmsh modify ltm profile http http_${HTTPBaseName} explicit-proxy { default-connect-handling deny }

tmsh list ltm profile http
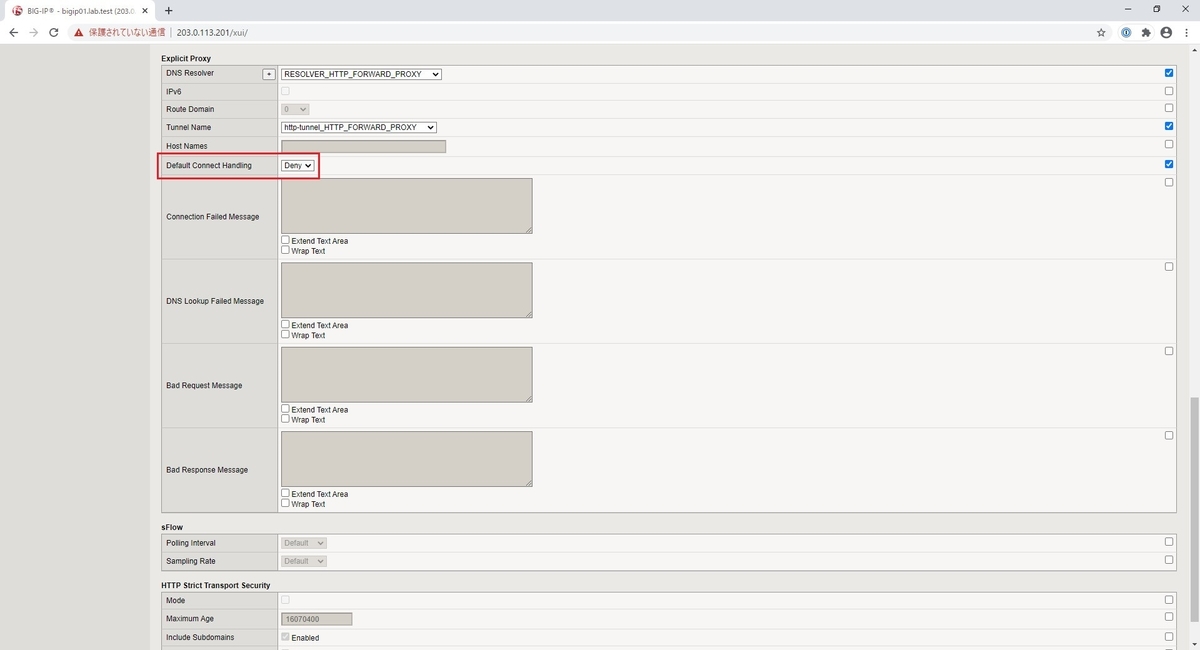
Web UI
本手順で作成済みの HTTP Profile を Allow から Deny に修正します。
Web UI では Local Traffic > Profiles > Services > HTTP より下記の表の設定に相当します。設定項目 設定値 備考 Name http_HTTP_FORWARD_PROXY Default Connect Handling Deny
SSL Forward Proxyの疎通確認
改めてHTTPとHTTPSで疎通確認を行います。
BIG-IP自身から接続確認を行う場合は、bashの変数を活用して下記のように curl コマンドで疎通確認を行います。
SSL Forward ProxyはSSL通信のインターセプトを行う性質上、HTTPS接続ではSSL証明書の警告が出ます。 curl コマンドでSSL証明書の警告を無視する際は --insecure オプションを使用します。
VS_IP="192.0.2.211"
VS_PORT="8080"

echo $VS_IP
echo $VS_PORT

curl --verbose --proxy ${VS_IP}:${VS_PORT} http://www.example.com

curl --verbose --proxy ${VS_IP}:${VS_PORT} https://www.example.com

curl --verbose --insecure --proxy ${VS_IP}:${VS_PORT} https://www.example.com
- SSL証明書の警告の出力例
[root@bigip01:Active:Standalone] config # curl --verbose --proxy ${VS_IP}:${VS_PORT} https://www.example.com
* Rebuilt URL to: https://www.example.com/
*   Trying 192.0.2.211...
* Connected to 192.0.2.211 (192.0.2.211) port 8080 (#0)
* Establish HTTP proxy tunnel to www.example.com:443
> CONNECT www.example.com:443 HTTP/1.1
> Host: www.example.com:443
> User-Agent: curl/7.47.1
> Proxy-Connection: Keep-Alive
>
< HTTP/1.1 200 Connected
<
* Proxy replied OK to CONNECT request
* ALPN, offering h2
* ALPN, offering http/1.1
* Cipher selection: ALL:!EXPORT:!EXPORT40:!EXPORT56:!aNULL:!LOW:!RC4:@STRENGTH
* successfully set certificate verify locations:
*   CAfile: /etc/pki/tls/certs/ca-bundle.crt
  CApath: none
* TLSv1.2 (OUT), TLS header, Certificate Status (22):
* TLSv1.2 (OUT), TLS handshake, Client hello (1):
* TLSv1.2 (IN), TLS handshake, Server hello (2):
* TLSv1.2 (IN), TLS handshake, Certificate (11):
* TLSv1.2 (OUT), TLS alert, Server hello (2):
* SSL certificate problem: self signed certificate in certificate chain
* Closing connection 0
curl: (60) SSL certificate problem: self signed certificate in certificate chain
More details here: https://curl.haxx.se/docs/sslcerts.html

curl performs SSL certificate verification by default, using a "bundle"
 of Certificate Authority (CA) public keys (CA certs). If the default
 bundle file isn't adequate, you can specify an alternate file
 using the --cacert option.
If this HTTPS server uses a certificate signed by a CA represented in
 the bundle, the certificate verification probably failed due to a
 problem with the certificate (it might be expired, or the name might
 not match the domain name in the URL).
If you'd like to turn off curl's verification of the certificate, use
 the -k (or --insecure) option.
[root@bigip01:Active:Standalone] config #
SSL Forward ProxyとなっているBIG-IPが提示するCA証明書(SSL証明書)を curl コマンドで信頼する場合は、 --cacert オプションを使用します。本例ではBIG-IP自身で作成したCA証明書を指定しています。
VS_IP="192.0.2.211"
VS_PORT="8080"

echo $VS_IP
echo $VS_PORT

SSLBaseName="SSL_FORWARD_PROXY"
dirname="/var/tmp"

echo $SSLBaseName
echo $dirname
ls ${dirname}/${SSLBaseName}.crt

curl --verbose --proxy ${VS_IP}:${VS_PORT} --cacert ${dirname}/${SSLBaseName}.crt https://www.example.com
設定の保存
CLIから操作したメモリ上の設定内容をファイルに書き込みます。
tmsh save sys config partitions all
最後に
必要に応じて仮想マシンのスナップショットを取得したり、UCSファイルのバックアップを取得して、本構成の状態に戻しやすくします。
なお、ホスト名_YYYYMMDD_HHMM の命名規則で UCS ファイルを取得する場合は次のようになります。
tmsh list sys ucs

echo ${HOSTNAME}_`date +%Y%m%d`_`date +%H%M`

tmsh save sys ucs ${HOSTNAME}_`date +%Y%m%d`_`date +%H%M`

tmsh list sys ucs
更新履歴
更新日: 2020-09-25
更新箇所 #01
「HTTP Profileの設定」の CLI より http-tunnel (tcp-forard) の指定箇所を変数名を参照するように修正しました。
http-tunnel_HTTP_FORWARD_PROXY から http-tunnel_${HTTPBaseName} の修正になります。
- 修正前 (Before)
tmsh create ltm profile http http_${HTTPBaseName} { defaults-from http-explicit explicit-proxy { default-connect-handling allow dns-resolver RESOLVER_${HTTPBaseName} tunnel-name http-tunnel_HTTP_FORWARD_PROXY } proxy-type explicit }
- 修正後 (After)
tmsh create ltm profile http http_${HTTPBaseName} { defaults-from http-explicit explicit-proxy { default-connect-handling allow dns-resolver RESOLVER_${HTTPBaseName} tunnel-name http-tunnel_${HTTPBaseName} } proxy-type explicit }
更新箇所 #02
「SSL Forward Proxy向けの変数の設定」の国名を表す C (Country Name) を日本向けとするために FR から JP へ修正しました。
- 修正前 (Before)
CASubject="/C=FR/O=DEMO\ COMPANY/CN=SSL\ FORWARD\ PROXY\ CA"
- 修正後 (After)
CASubject="/C=JP/O=DEMO\ COMPANY/CN=SSL\ FORWARD\ PROXY\ CA"
更新日: 2022-01-09
更新箇所 #01
SSL Forward Proxy向けVirtual Server上で 443 以外のポート (例: 8080)の通信を通せるように Service Port を Port - 443 から Port - 0 (* All Ports) に修正しました。画面キャプチャも置き換えています。
CLIでの設定は下記のように destination 0.0.0.0:https を destination 0.0.0.0:any に修正しています。
- 修正前 (Before)
tmsh create ltm virtual VS_${SSLBaseName} { destination 0.0.0.0:https ip-protocol tcp profiles replace-all-with { clientssl_${SSLBaseName} { context clientside } serverssl_${SSLBaseName} { context serverside } http { } tcp { } } source 0.0.0.0/0 translate-address disabled translate-port disabled vlans replace-all-with { http-tunnel_${HTTPBaseName} } vlans-enabled }
- 修正後 (After)
tmsh create ltm virtual VS_${SSLBaseName} { destination 0.0.0.0:any ip-protocol tcp profiles replace-all-with { clientssl_${SSLBaseName} { context clientside } serverssl_${SSLBaseName} { context serverside } http { } tcp { } } source 0.0.0.0/0 translate-address disabled translate-port disabled vlans replace-all-with { http-tunnel_${HTTPBaseName} } vlans-enabled }