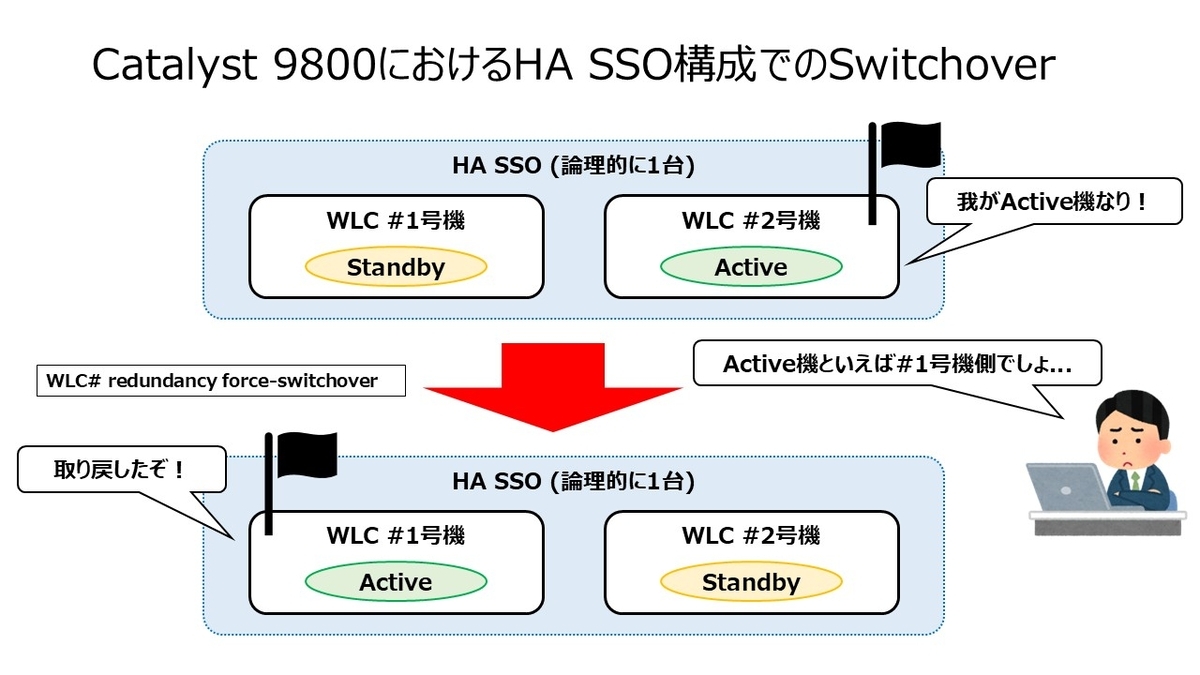
HA SSOのActive機とStandby機の両機に対して、可能であれば、CW9800Mのような物理版はSerial Console、C9800-CLの仮想版は仮想Consoleにアクセスします。
また万が一に備えてターミナルでログの取得をしておきます。
Swithoverの作業風景
事前 (Before)の状態確認
Active機とStandby機の状態が想定通りであることを確認します。
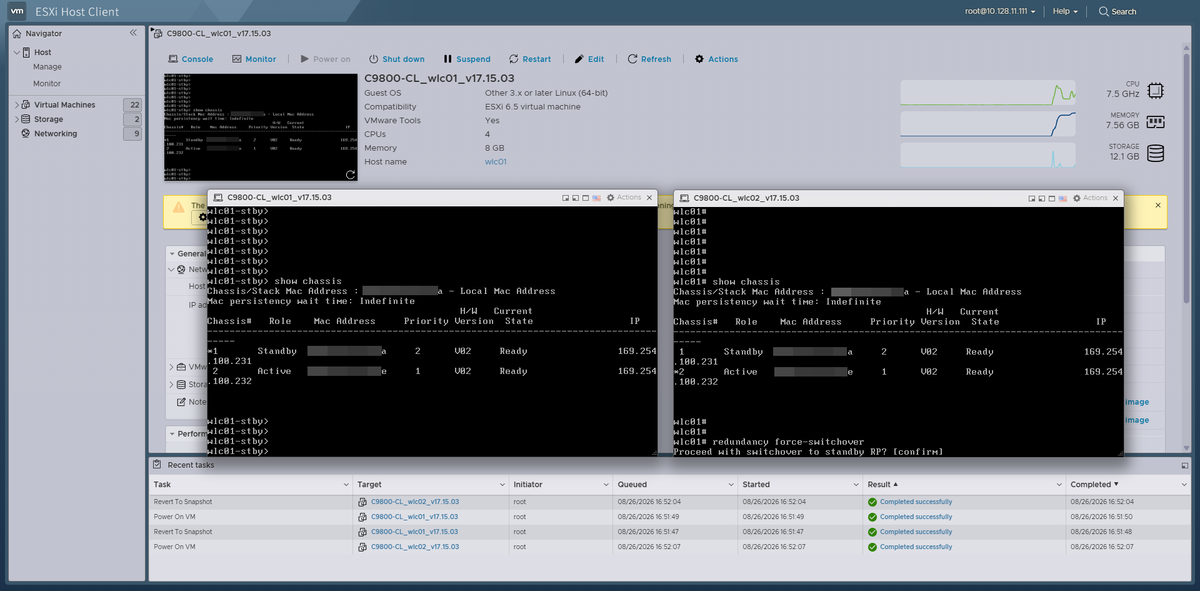
show chassis
下記は#2号機 (Chassis#2)側がActive機の出力例です。
wlc01# show chassis
Chassis/Stack Mac Address : ****.****.***a - Local Mac Address
Mac persistency wait time: Indefinite
                                             H/W   Current
Chassis#   Role    Mac Address     Priority Version  State                 IP
-------------------------------------------------------------------------------------
 1       Standby  ****.****.***a     2      V02     Ready                169.254.100.231
*2       Active   ****.****.***e     1      V02     Ready                169.254.100.232


wlc01#
実際のSwitchoverの実行
現在ActiveのWLCでSwitchoverを実施します。
redundancy force-switchover
下記のように対話入力が発生します。
wlc02# redundancy force-switchover
Proceed with switchover to standby RP? [confirm]
<Meraki>

Global Use AP ships with Meraki OS as the primary image and with default no
country domain configured. Depending on the DHCP/DNS configurations and Cloud
connectivity AP will either stay in Meraki or Catalyst mode to reach WLCs. To
get more details on the procedure please look at online documentation.

We have currently detected the Access Point is in Day 0 mode. i.e doesn't have
a persona yet. AP will proceed for offline migration shortly. Offline
migration procedure will check if a Catalyst WLC is present in the network and
automatically migrate to Catalyst if a valid one is detected (>= IOS XE 17.15)

Offline migration can take up to 15 minutes to take a decision. To get logs
and details on the current state of offline migration procedure, please type
'offline-migration-info' command after <Meraki> console prompt.

If the intent for the Access Point is to be connected via Meraki mode, resolve
the Cloud connectivity and follow the Dashboard procedure to claim the device
on the network.

Version: 1.2

<Meraki> offline-migration-info
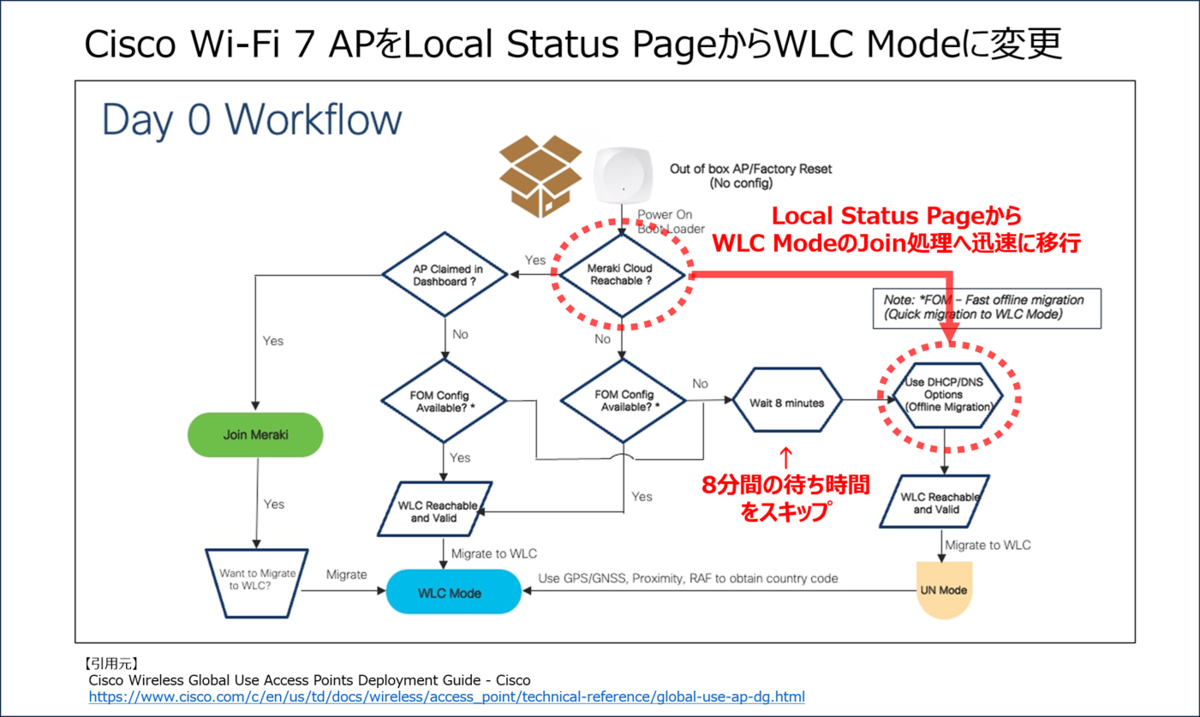
| [2000-01-01 00:00:48.752] AP in day0 - offline migration
| [2000-01-01 00:02:59.190] [init] start offline migration detection (v1.2)
| [2026-08-14 14:58:18.423] [fast-offline-migration-delay] forcing DHCPv6 INFORMATION REQUEST
| [2026-08-14 14:58:23.482] [fast-offline-migration][v4] no fast offline migration by DHCP
| [2026-08-14 14:58:23.482] [fast-offline-migration][v6] no fast offline migration by DHCP
| [2026-08-14 14:58:23.482] [fast-offline-migration][v4] missing DNS config (server and/or domain)
| [2026-08-14 14:58:23.482] [fast-offline-migration][v6] missing DNS config (server and/or domain)
| [2026-08-14 14:58:23.482] [fast-offline-migration] waiting for 420sec before taking any migration decision
| [2026-08-14 14:59:24.32 ] [fast-offline-migration] waiting for 360sec before taking any migration decision
| [2026-08-14 15:00:24.572] [fast-offline-migration] waiting for 299sec before taking any migration decision
| [2026-08-14 15:01:25.111] [fast-offline-migration] waiting for 239sec before taking any migration decision
| [2026-08-14 15:02:25.643] [fast-offline-migration] waiting for 178sec before taking any migration decision
| [2026-08-14 15:03:26.179] [fast-offline-migration] waiting for 118sec before taking any migration decision
| [2026-08-14 15:04:26.710] [fast-offline-migration] waiting for 57sec before taking any migration decision
| [2026-08-14 15:05:27.233] [offline-migration] forcing DHCP renew
| [2026-08-14 15:05:27.233] [offline-migration] forcing DHCPv6 INFORMATION REQUEST
<Meraki>
DHCP Option 43やDNSによってWLCを検出できなかった場合や、WLCを検出できてもJoinできなかった場合は、処理がループして繰り返されます。その場合のログとしては「[offline-migration] no migration & not claimed => restart detection」が表示されます。下記は長時間の放置をしていた際のログです。
<Meraki> offline-migration-info
| [2000-01-01 00:00:49.29 ] AP in day0 - offline migration
| [2000-01-01 00:03:09.112] [init] start offline migration detection (v1.2)
| [2000-01-01 00:04:55.447] [init] start offline migration detection (v1.2)
| [2026-08-15 06:07:45.984] [fast-offline-migration-delay] forcing DHCPv6 INFORMATION REQUEST
| [2026-08-15 06:07:51.48 ] [fast-offline-migration][v4] no fast offline migration by DHCP
| [2026-08-15 06:07:51.48 ] [fast-offline-migration][v6] no fast offline migration by DHCP
| [2026-08-15 06:07:51.48 ] [fast-offline-migration][v4] missing DNS config (server and/or domain)
| [2026-08-15 06:07:51.48 ] [fast-offline-migration][v6] missing DNS config (server and/or domain)
| [2026-08-15 06:07:51.48 ] [fast-offline-migration] waiting for 420sec before taking any migration decision
| [2026-08-15 06:08:51.600] [fast-offline-migration] waiting for 360sec before taking any migration decision
| [2026-08-15 06:09:52.143] [fast-offline-migration] waiting for 299sec before taking any migration decision
| [2026-08-15 06:10:52.677] [fast-offline-migration] waiting for 239sec before taking any migration decision
| [2026-08-15 06:11:53.211] [fast-offline-migration] waiting for 178sec before taking any migration decision
| [2026-08-15 06:12:53.730] [fast-offline-migration] waiting for 118sec before taking any migration decision
| [2026-08-15 06:13:54.270] [fast-offline-migration] waiting for 57sec before taking any migration decision
| [2026-08-15 06:14:54.799] [offline-migration] forcing DHCP renew
| [2026-08-15 06:14:54.799] [offline-migration] forcing DHCPv6 INFORMATION REQUEST
| [2026-08-15 06:14:59.842] [offline-migration] migration decision
| [2026-08-15 06:14:59.843] [offline-migration][v4] no WLC IP in DHCP option 43
| [2026-08-15 06:14:59.843] [offline-migration][v4] missing DNS config (server and/or domain)
| [2026-08-15 06:14:59.843] [offline-migration][v6] no WLC IP in DHCP option 52
| [2026-08-15 06:14:59.843] [offline-migration][v6] missing DNS config (server and/or domain)
| [2026-08-15 06:15:04.958] [offline-migration][v4][capwap-l2] 0 WLC(s) detected (unsupported)
| [2026-08-15 06:15:09.988] [offline-migration][v6][capwap-l2] 0 WLC(s) detected (unsupported)
| [2026-08-15 06:15:09.988] [offline-migration] no migration & not claimed => restart detection
| [2026-08-15 06:15:15.32 ] [init] start offline migration detection (v1.2)
| [2026-08-15 06:16:15.567] [fast-offline-migration-delay] forcing DHCPv6 INFORMATION REQUEST
| [2026-08-15 06:16:20.696] [fast-offline-migration][v4] no fast offline migration by DHCP
| [2026-08-15 06:16:20.696] [fast-offline-migration][v6] no fast offline migration by DHCP
| [2026-08-15 06:16:20.696] [fast-offline-migration][v4] missing DNS config (server and/or domain)
| [2026-08-15 06:16:20.696] [fast-offline-migration][v6] missing DNS config (server and/or domain)
| [2026-08-15 06:16:20.696] [fast-offline-migration] waiting for 420sec before taking any migration decision
| [2026-08-15 06:17:21.233] [fast-offline-migration] waiting for 360sec before taking any migration decision
| [2026-08-15 06:18:21.776] [fast-offline-migration] waiting for 299sec before taking any migration decision
| [2026-08-15 06:19:22.306] [fast-offline-migration] waiting for 239sec before taking any migration decision
| [2026-08-15 06:20:22.849] [fast-offline-migration] waiting for 178sec before taking any migration decision
| [2026-08-15 06:21:23.394] [fast-offline-migration] waiting for 118sec before taking any migration decision
| [2026-08-15 06:22:23.923] [fast-offline-migration] waiting for 57sec before taking any migration decision
| [2026-08-15 06:23:24.453] [offline-migration] forcing DHCP renew
| [2026-08-15 06:23:24.453] [offline-migration] forcing DHCPv6 INFORMATION REQUEST
| [2026-08-15 06:23:29.496] [offline-migration] migration decision
| [2026-08-15 06:23:29.497] [offline-migration][v4] no WLC IP in DHCP option 43
| [2026-08-15 06:23:29.497] [offline-migration][v4] missing DNS config (server and/or domain)
| [2026-08-15 06:23:29.497] [offline-migration][v6] no WLC IP in DHCP option 52
| [2026-08-15 06:23:29.497] [offline-migration][v6] missing DNS config (server and/or domain)
| [2026-08-15 06:23:34.764] [offline-migration][v4][capwap-l2] 0 WLC(s) detected (unsupported)
| [2026-08-15 06:23:39.794] [offline-migration][v6][capwap-l2] 0 WLC(s) detected (unsupported)
| [2026-08-15 06:23:39.795] [offline-migration] no migration & not claimed => restart detection
<snip>
<Meraki>
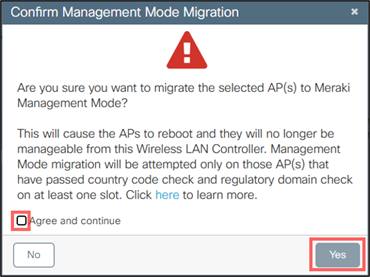
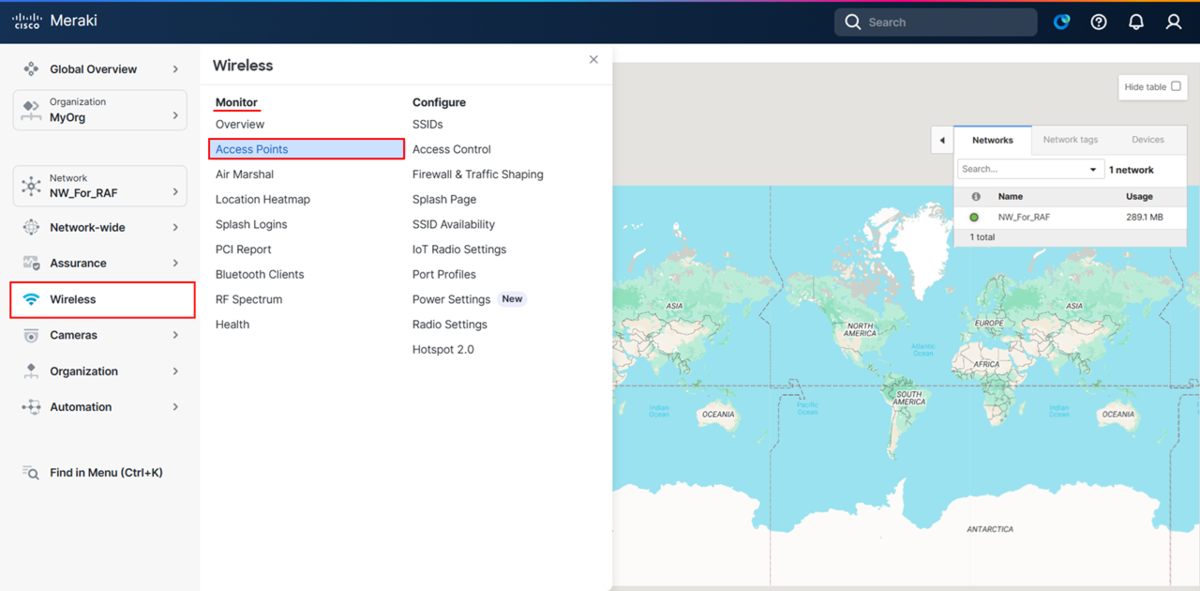
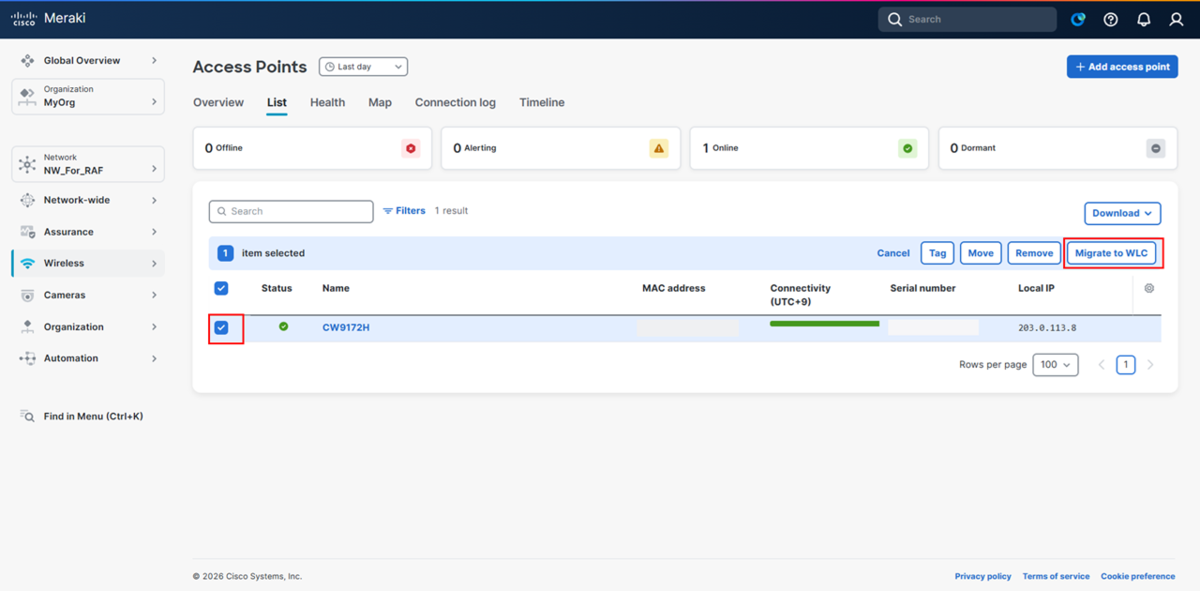
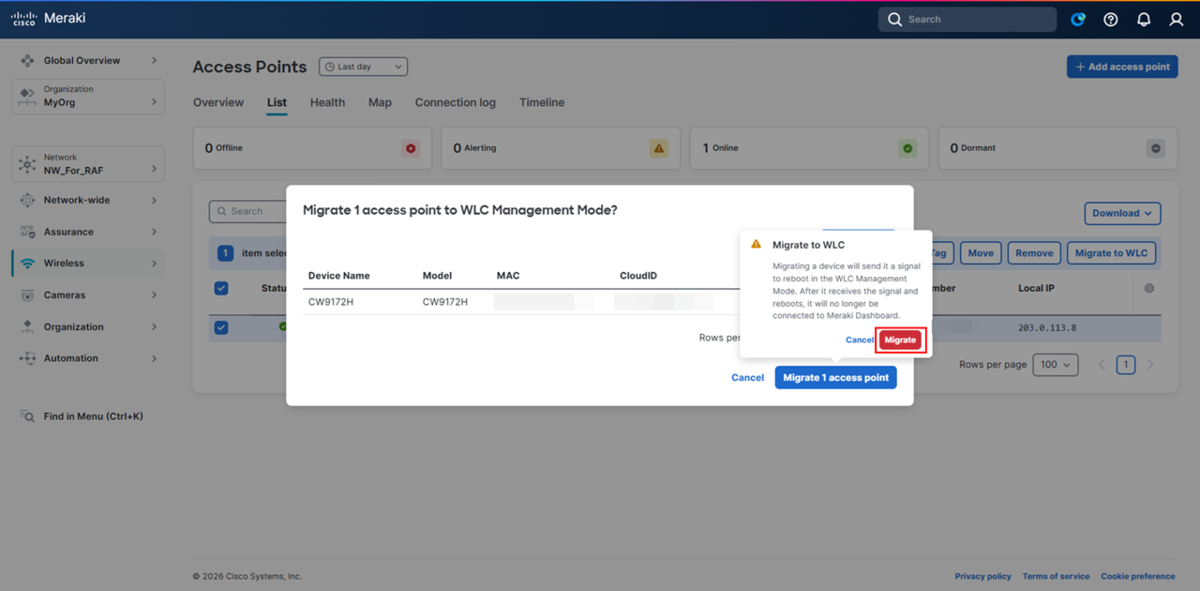
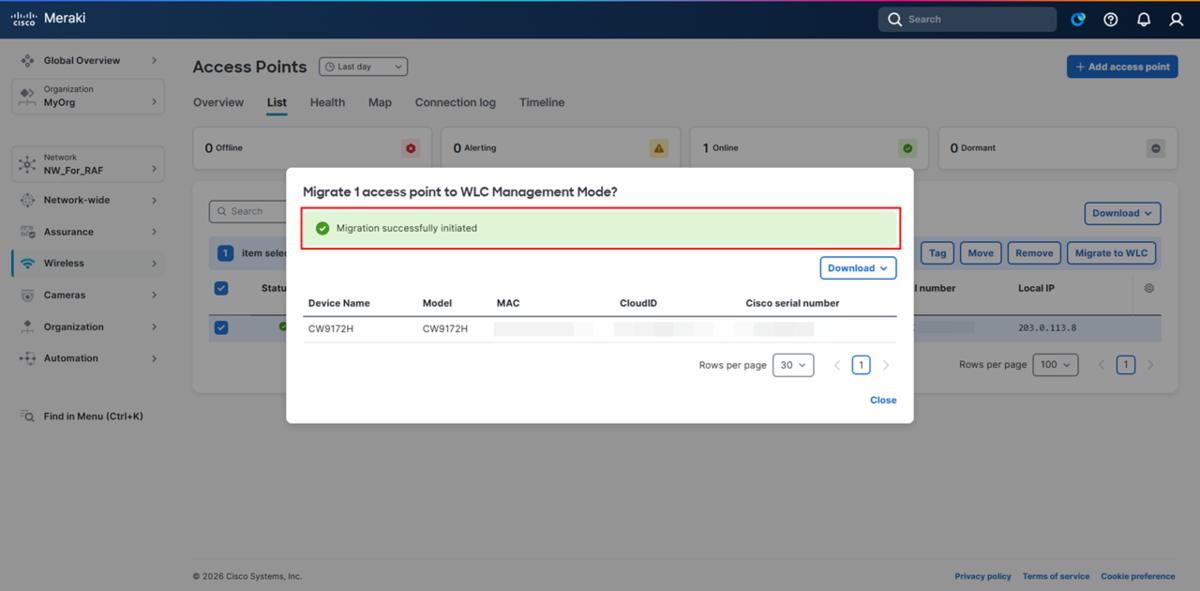
警告がポップアップします。内容を確認して問題が無ければ「agree and continue」にチェックを入れて「Yes」ボタンを押下します。実行するとMigrate処理がほぼ即時的に行われます。
Are you sure you want to migrate the selected AP(s) to Meraki Management Mode?
This will cause the APs to reboot and they will no longer be manageable from this Wireless LAN Controller. Management Mode migration will be attempted only on those AP(s) that have passed country code check and regulatory domain check on at least one slot. Click here to learn more.
警告のポップアップ
「Click here to learn more.」の「here」の部分を押下すると、Catalyst 9800に内蔵されているオンライン ヘルプが開きます。
Migration to Wireless LAN Controller could not be initiated for some of the requested devices.

****-****-****
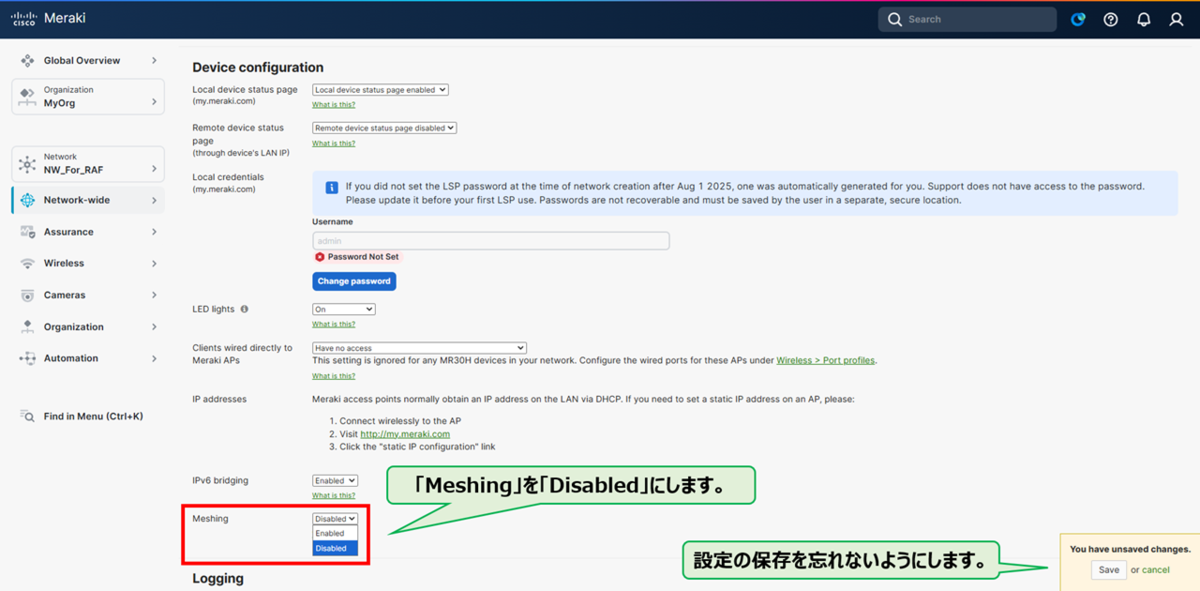
Node cannot be migrated unless meshing is disabled for the node's network
「Meraki Dashboard管理 (Meraki Mode)」と「Catalyst 9800管理 (WLC Mode)」が混在している環境で、Meshを無効化する際の影響が気になる場合は、移行専用のNetworkを作成してMeraki AP (変換対象の無線AP)を所属させる方法があります。
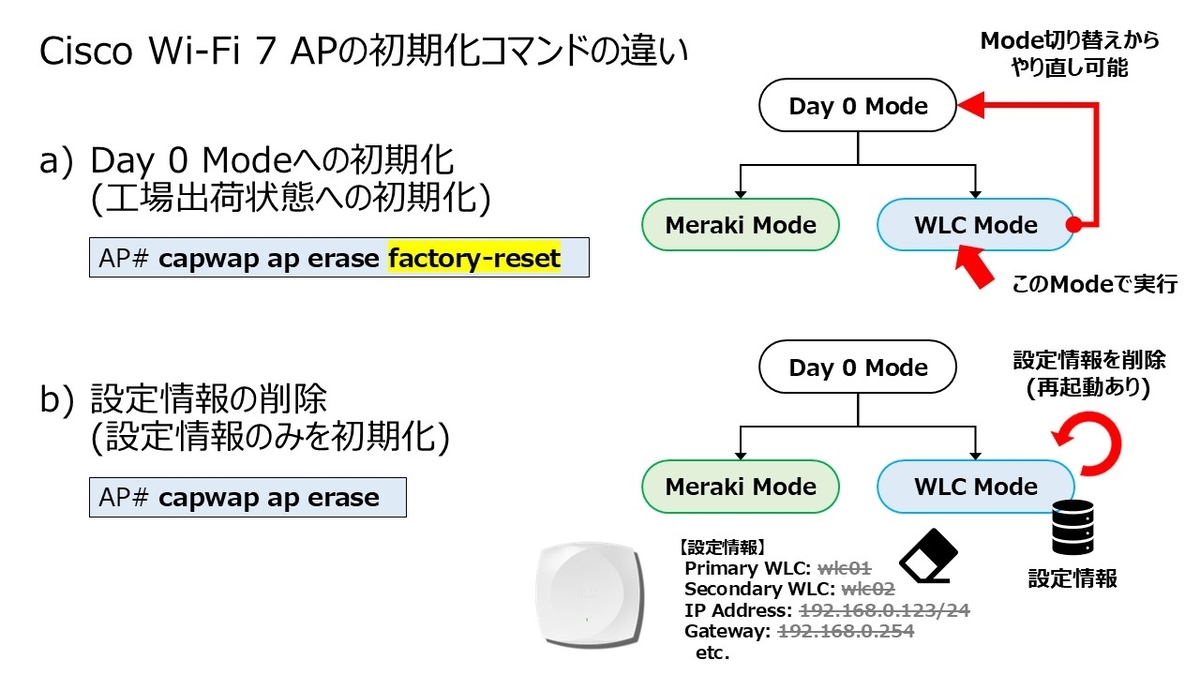
Cisco Wi-Fi 7 AP (CW917xシリーズ)を工場出荷状態 (Day 0 Mode)へ初期化したい場合は、従来のCatalyst AP (Wi-Fi 6/6Eなど)と異なり「factory-reset」のキーワードが必要になります。
Cisco Wi-Fi 7 APの初期化コマンドの違い
コマンド
「factory-reset」のキーワードを忘れずに!!
capwap ap erase factory-reset
なお、コマンドの実行時には「Are you sure you want to continue? [confirm]」と本当に実施するかを問われます。
CW917x# capwap ap erase factory-reset

WARNING :" capwap ap erase factory-reset" will convert to Meraki Day0 mode,
 WIPE DATA and Reboot AP.
The following files will be cleared as part of this process
1) Config ,Bak config files
2) Crashfiles
3) syslogs
4) Boot variables
5) Pktlogs
6) Manually created files
 Are you sure you want to continue? [confirm]
<snip>
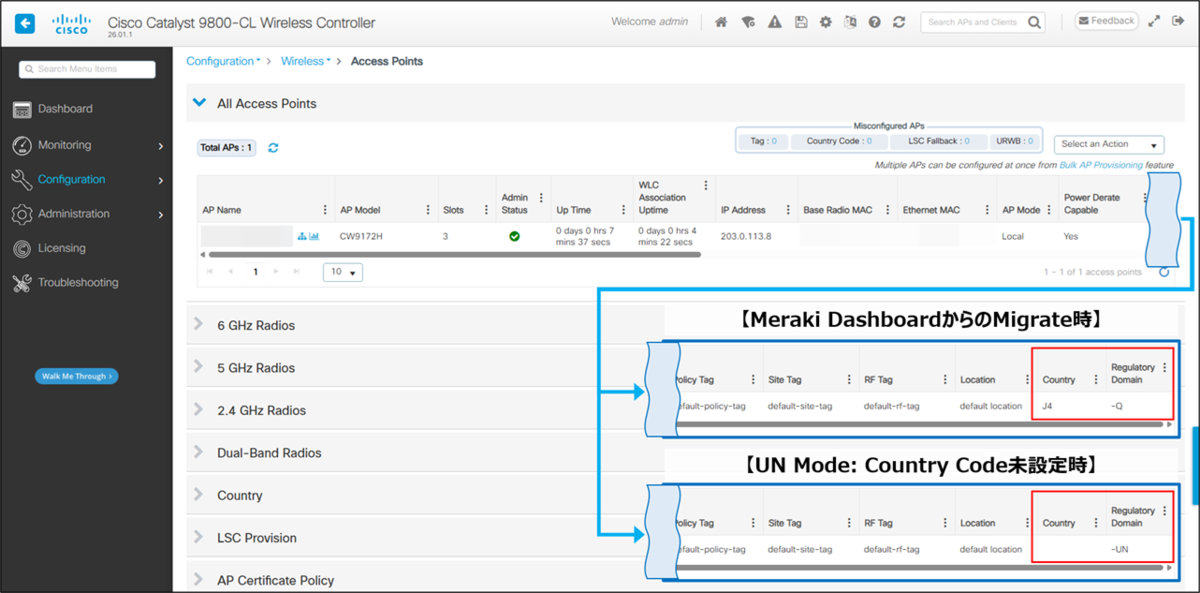
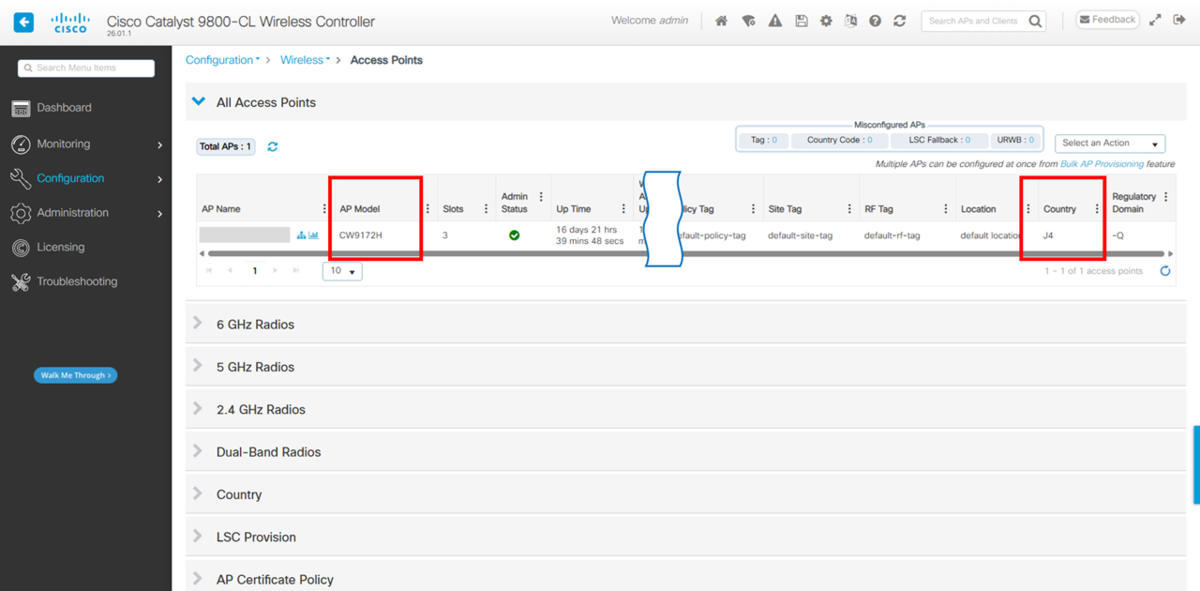
Web UIであれば、メニュー「Configuration > Wireless > Access Points」から確認できます。
Catalyst 9800 v26.1.1のWeb UIでの例
CLIであれば、「show ap summary」を実行して「CC」(Country Code)の欄から確認できます。
WLC# show ap summary
Number of APs: 1

CC = Country Code
RD = Regulatory Domain

AP Name                          Slots AP Model             Ethernet MAC   Radio MAC      CC   RD   IP Address                                State        Location
---------------------------------------------------------------------------------------------------------------------------------------------------------------------
******.****.****                 3     CW9172H              ****.****.**** ****.****.**** J4   -Q   203.0.113.8                               Registered   default location

WLC#
site-survey-AP# show dot11 wlan
Radio Vap SSID State    Auth Assoc Switching  DHCP
    0   0       DOWN Central Local   Central Local
    0   1       DOWN Central Local   Central Local
    0   2       DOWN Central Local   Central Local
    0   3       DOWN Central Local   Central Local
    0   4       DOWN Central Local   Central Local
    0   5       DOWN Central Local   Central Local
    0   6       DOWN Central Local   Central Local
    0   7       DOWN Central Local   Central Local
    0   8       DOWN Central Local   Central Local
    0   9       DOWN Central Local   Central Local
    0  10       DOWN Central Local   Central Local
    0  11       DOWN Central Local   Central Local
    0  12       DOWN Central Local   Central Local
    0  13       DOWN Central Local   Central Local
    0  14       DOWN Central Local   Central Local
    0  15       DOWN   Local Local     Local Local
    1   0       DOWN Central Local   Central Local
    1   1       DOWN Central Local   Central Local
    1   2       DOWN Central Local   Central Local
    1   3       DOWN Central Local   Central Local
    1   4       DOWN Central Local   Central Local
    1   5       DOWN Central Local   Central Local
    1   6       DOWN Central Local   Central Local
    1   7       DOWN Central Local   Central Local
    1   8       DOWN Central Local   Central Local
    1   9       DOWN Central Local   Central Local
    1  10       DOWN Central Local   Central Local
    1  11       DOWN Central Local   Central Local
    1  12       DOWN Central Local   Central Local
    1  13       DOWN Central Local   Central Local
    1  14       DOWN Central Local   Central Local
    1  15       DOWN   Local Local     Local Local
    2   0       DOWN Central Local   Central Local
    2   1       DOWN Central Local   Central Local
    2   2       DOWN Central Local   Central Local
    2   3       DOWN Central Local   Central Local
    2   4       DOWN Central Local   Central Local
    2   5       DOWN Central Local   Central Local
    2   6       DOWN Central Local   Central Local
    2   7       DOWN Central Local   Central Local
    2   8       DOWN Central Local   Central Local
    2   9       DOWN Central Local   Central Local
    2  10       DOWN Central Local   Central Local
    2  11       DOWN Central Local   Central Local
    2  12       DOWN Central Local   Central Local
    2  13       DOWN Central Local   Central Local
    2  14       DOWN Central Local   Central Local
    2  15       DOWN   Local Local     Local Local

site-survey-AP#
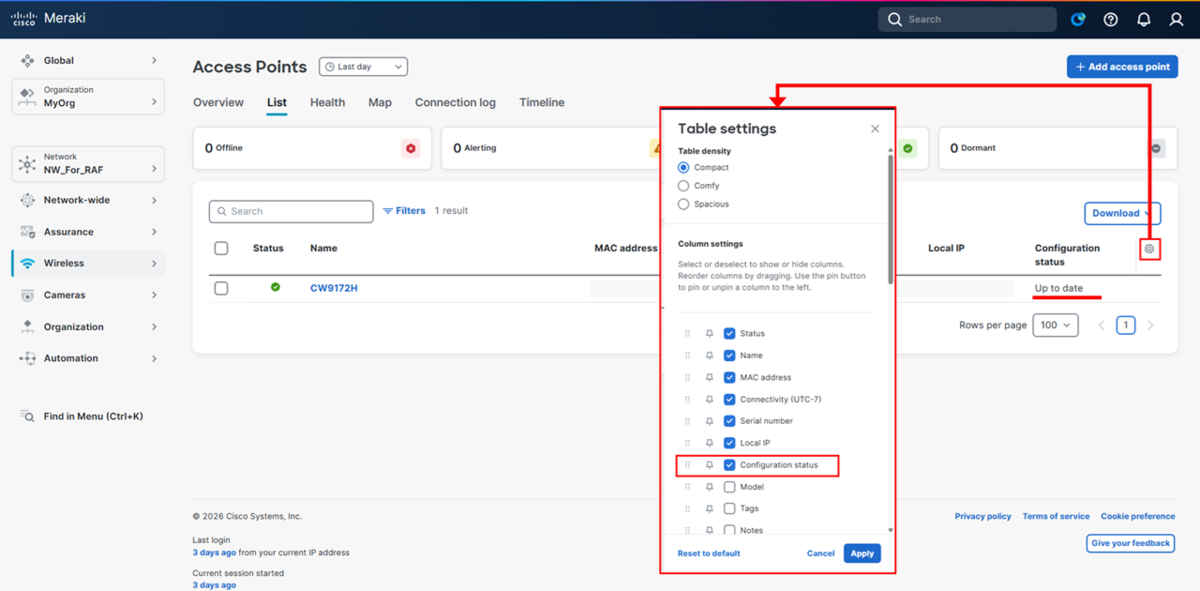
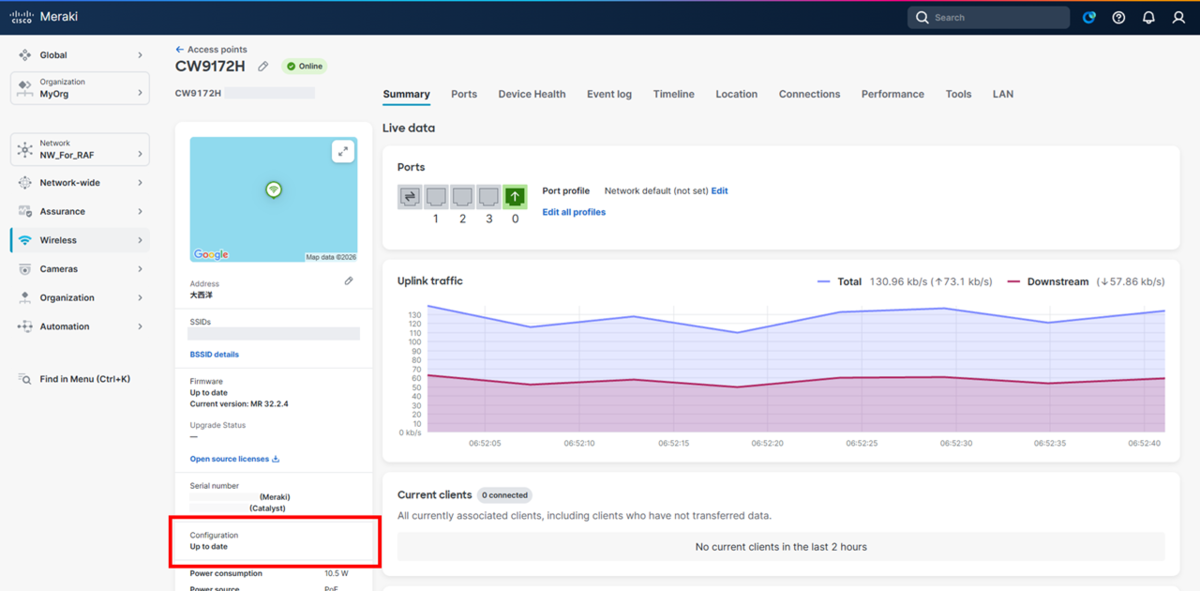
前提条件: 達成 (OK)
無線APのモデル名に応じたSSIDの情報が表示されてSSID StateもUpになります。
site-survey-AP# show dot11 wlan
Radio Vap                SSID State    Auth Assoc Switching  DHCP
    0   0                      DOWN Central Local   Central Local
    0   1                      DOWN Central Local   Central Local
    0   2                      DOWN Central Local   Central Local
    0   3                      DOWN Central Local   Central Local
    0   4                      DOWN Central Local   Central Local
    0   5                      DOWN Central Local   Central Local
    0   6                      DOWN Central Local   Central Local
    0   7                      DOWN Central Local   Central Local
    0   8                      DOWN Central Local   Central Local
    0   9                      DOWN Central Local   Central Local
    0  10                      DOWN Central Local   Central Local
    0  11                      DOWN Central Local   Central Local
    0  12                      DOWN Central Local   Central Local
    0  13                      DOWN Central Local   Central Local
    0  14                      DOWN Central Local   Central Local
    0  15 CW9172H_site_survey    UP   Local Local     Local Local
    1   0                      DOWN Central Local   Central Local
    1   1                      DOWN Central Local   Central Local
    1   2                      DOWN Central Local   Central Local
    1   3                      DOWN Central Local   Central Local
    1   4                      DOWN Central Local   Central Local
    1   5                      DOWN Central Local   Central Local
    1   6                      DOWN Central Local   Central Local
    1   7                      DOWN Central Local   Central Local
    1   8                      DOWN Central Local   Central Local
    1   9                      DOWN Central Local   Central Local
    1  10                      DOWN Central Local   Central Local
    1  11                      DOWN Central Local   Central Local
    1  12                      DOWN Central Local   Central Local
    1  13                      DOWN Central Local   Central Local
    1  14                      DOWN Central Local   Central Local
    1  15 CW9172H_site_survey    UP   Local Local     Local Local
    2   0                      DOWN Central Local   Central Local
    2   1                      DOWN Central Local   Central Local
    2   2                      DOWN Central Local   Central Local
    2   3                      DOWN Central Local   Central Local
    2   4                      DOWN Central Local   Central Local
    2   5                      DOWN Central Local   Central Local
    2   6                      DOWN Central Local   Central Local
    2   7                      DOWN Central Local   Central Local
    2   8                      DOWN Central Local   Central Local
    2   9                      DOWN Central Local   Central Local
    2  10                      DOWN Central Local   Central Local
    2  11                      DOWN Central Local   Central Local
    2  12                      DOWN Central Local   Central Local
    2  13                      DOWN Central Local   Central Local
    2  14                      DOWN Central Local   Central Local
    2  15 CW9172H_site_survey    UP   Local Local     Local Local

site-survey-AP#
Note:
1. If an AP is converted to Site Survey mode while connected to a WLC, it will disjoin and go into standalone mode.
2. For the above mentioned Site Survey functionality, the AP should have joined a Catalyst 9800 WLC atleast once. When the AP is in Day 0 mode, the CLI to convert the AP to Site Survey mode is not present.
3. The AP carries over the country code configured, while it was connected to the Catalyst 9800 WLC.
USB Type A Ports
The USB Type A ports provide access to external USB flash devices, also known as thumb drives or USB keys. The switch supports Cisco 64 MB, 256 MB, 512 MB, 1 GB, 4 GB, and 8 GB flash drives. You can use standard Cisco IOS command- line interface (CLI) commands to read, write, erase, and copy to or from the flash device. You can also configure the switch to boot from the USB flash drive.
Nov  6 20:22:08.910 JST: %USBFLASH-5-CHANGE: usbflash0 has been removed!
Nov  6 20:22:11.354 JST: %USBFLASH-4-FORMAT: usbflash0 contains unexpected values in partition table or boot sector.  Device needs formatting before use!
さらにサポート外のファイル システムのUSB Memoryを dir コマンドで中身を見ようとすると下記のようなエラーが出力されます。
# dir usbflash0:
%Error opening usbflash0:/ (Invalid DOS media or no media in slot)
#
USB Memoryのフォーマット
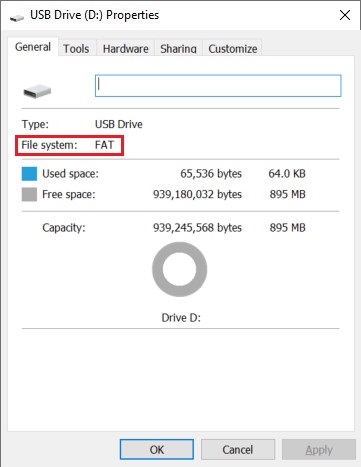
USB Memoryを利用するにはフォーマットが必要です。USB Memoryの中身が消されるので必要なファイルがある場合は退避しておいてください。
format usbflash0: コマンドでフォーマットを実行します。USB Memoryのスロットが usbflash0: (0番目) となっているため、別モデルで実行する際などは適宜修正してください。
# format usbflash0:
Format operation may take a while. Continue? [confirm]
Format operation will destroy all data in "usbflash0:".  Continue? [confirm]

Primary Partition created...Size 896 MB

Drive communication & 1st Sector Write OK...

Format: All system sectors written. OK...

Format: Total sectors in formatted partition: 1834976
Format: Total bytes in formatted partition: 939507712
Format: Operation completed successfully.

Format of usbflash0 complete
#
補足ですが筆者の環境では format コマンドにファイル システムの指定オプションなどはありませんでした。
# format usbflash0: ?
  <cr>

# format usbflash0:
USB Memoryのフォーマット直後に dir コマンドで中身を見た場合の出力例です。
# dir usbflash0:
Directory of usbflash0:/

No files in directory

939245568 bytes total (939245568 bytes free)
#
USB Memoryが認識可能になったら running-config やFirmwareのコピーに活用できます。
しかしながら、昨今のUSB Memoryの取り扱いはインシデントの未然防止のためにシビアになっているので注意してください。