F5 BIG-IP APM (Access Policy Manager)のExplicit Forward Proxyの検証構成を作成した際のメモ書きです。
本記事ではExplicit Forward ProxyにてKerberos認証の設定を行います。
本記事は下記の No.01 と No.02 の記事をベースとしています。
目次
概要
Active Directory環境下でのKerberos認証を行っているため、設定対象が複数登場します。 そのため、どの設定対象に対する作業であるかを留意してください。
検証構成

検証時の情報
- F5 BIG-IP Virtual Edition Version 15.1.0
Trial LicenseではSWG(Secure Web Gateway)とSSLO(SSL Orchestrator)は使用できないため無効化の状態です。
VMware vSphere ESXi 7.0 上に仮想マシンをデプロイしています。 - Microsoft Windows Server 2019 Datacenter Edition
- Microsoft Windows 10 Enterprise Edition
前提
本記事はWindows Server 2019のActive Directoryのセットアップと、Windows 10のドメイン参加が完了している前提としています。
Windows Server 2019側の作業
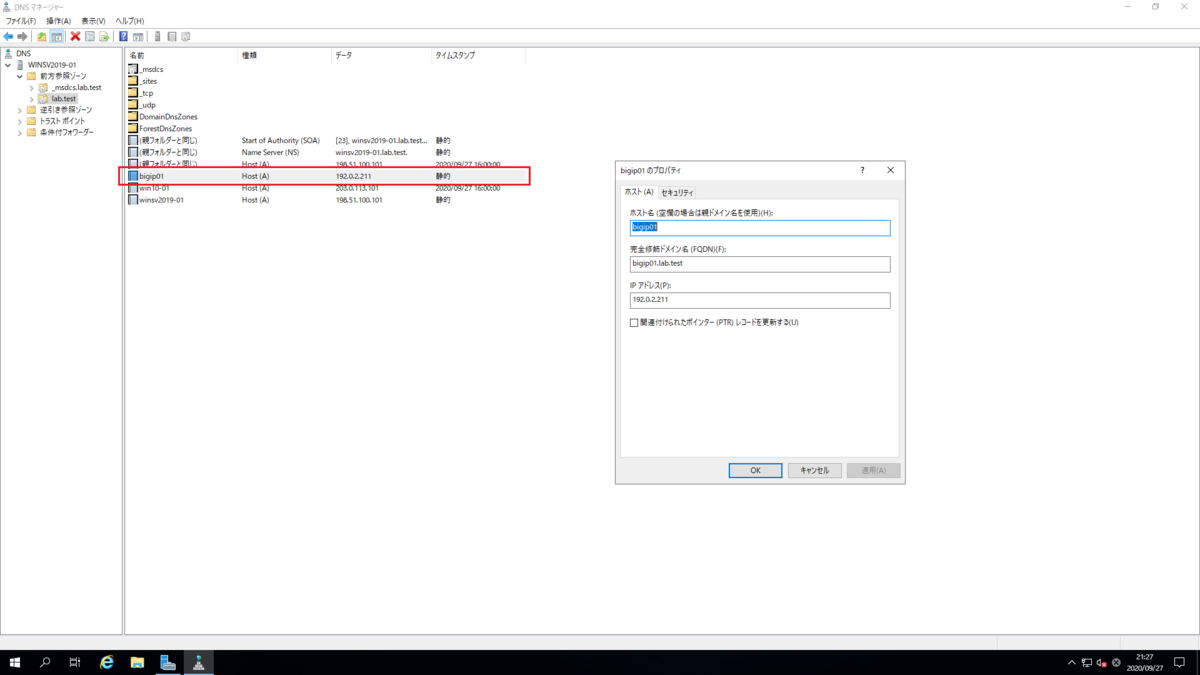
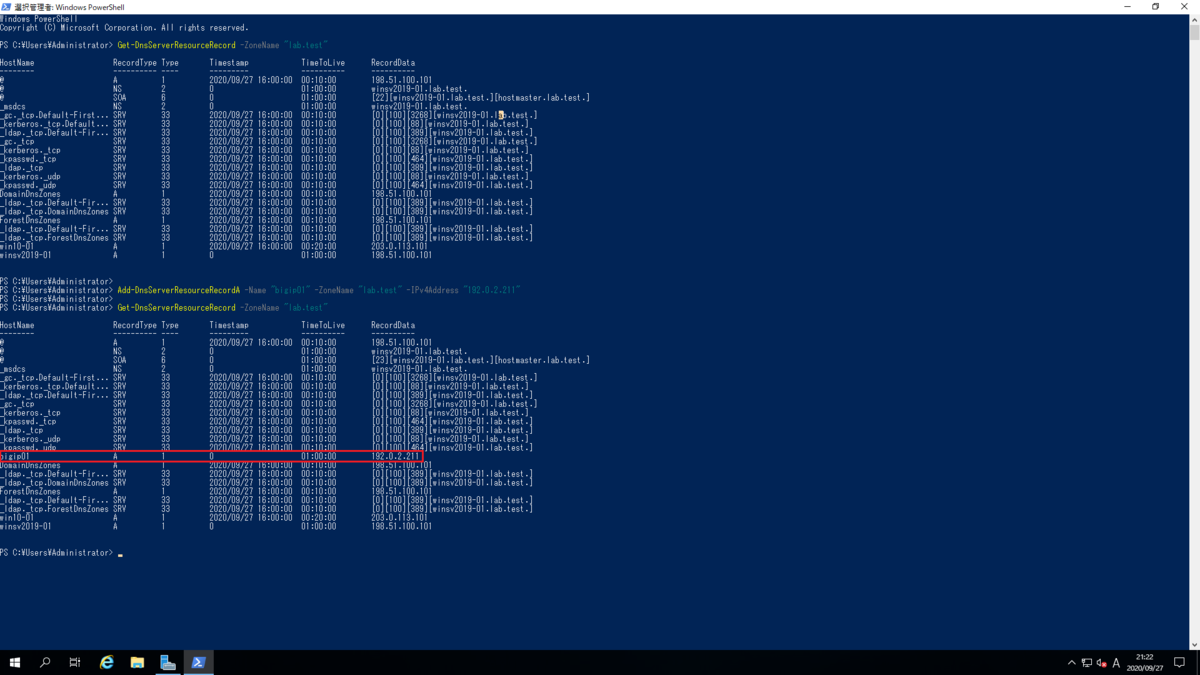
BIG-IP向けのDNSレコードの登録
Virtual ServerのHTTP Forward Proxyで待ち受けるIPアドレスを登録します。
本記事では Powershell で設定して、GUIツールである DNS マネージャーでも確認しております。
- Powershell
下記の表の通りに設定しております。
| 設定項目 | 設定値 | 備考 |
|---|---|---|
| Name | bigip01 | |
| ZoneName | lab.test | |
| IPv4Address | 192.0.2.211 | HTTP Forward Proxyで待ち受けるIPアドレスを指定します。 |
Get-DnsServerResourceRecord -ZoneName "lab.test"

Add-DnsServerResourceRecordA -Name "bigip01" -ZoneName "lab.test" -IPv4Address "192.0.2.211"

Get-DnsServerResourceRecord -ZoneName "lab.test"
Service Principal Name
Active Directoryのユーザーを作成した後に、Service Principal Nameを紐付けます。
まずは、ユーザーを作成します。
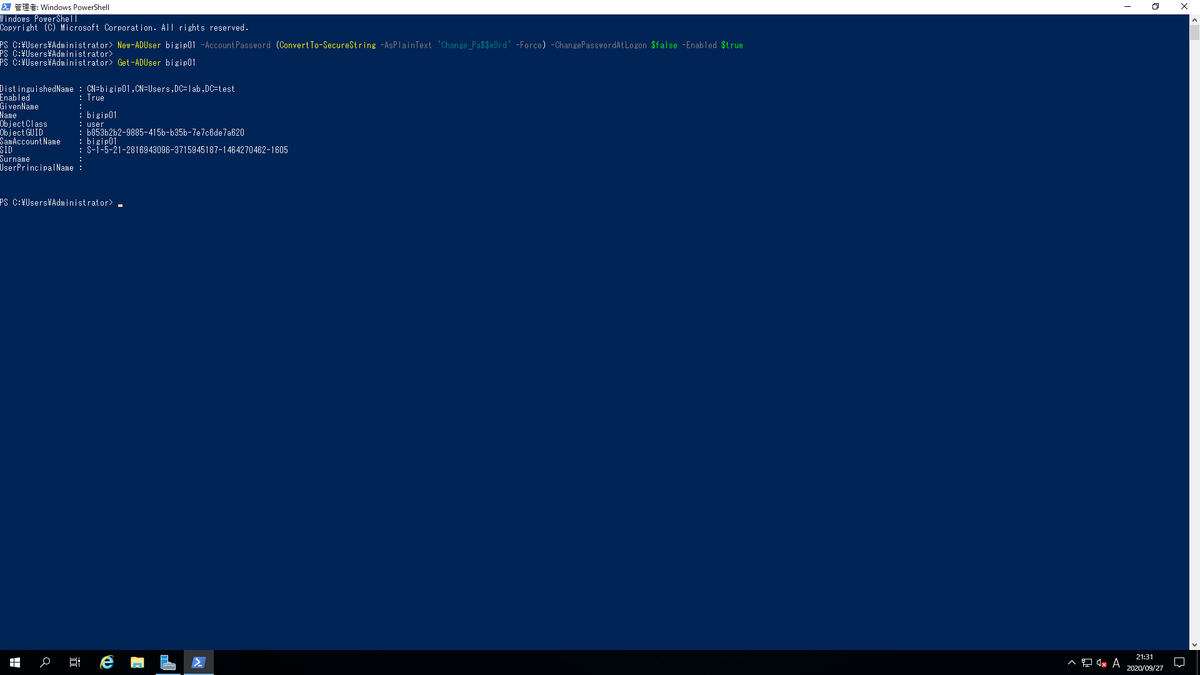
Active Directoryのユーザーの作成
本記事では Powershell で設定し、GUIツールである Active Directory ユーザーとコンピューター でも確認しております。
- Powershell
下記の表の通りに設定しております。
| 設定項目 | 設定値 | 備考 |
|---|---|---|
| AccountName | bigip01 | |
| AccountPassword | Change_Pa$$w0rd | 任意のパスワードへ変更してください。 |
New-ADUser bigip01 -AccountPassword (ConvertTo-SecureString -AsPlainText 'Change_Pa$$w0rd' -Force) -ChangePasswordAtLogon $false -Enabled $true

Get-ADUser bigip01
Active Directory ユーザーとコンピューター
Active Directory ユーザーとコンピューター のツールから見ると下記の画面キャプチャのようにユーザーが作成されています。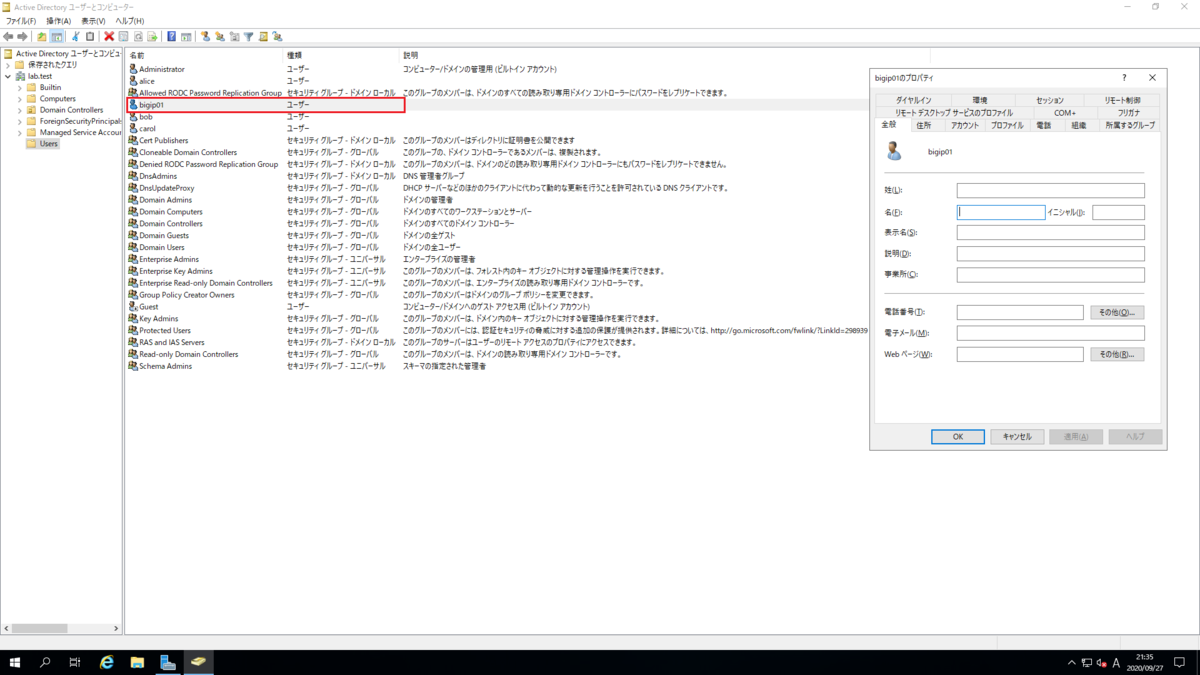
Active Directory ユーザーとコンピューター
Active DirectoryユーザーにService Principal Nameの紐付け
- コマンド プロンプト
先に作成したActive DirectoryのユーザーにService Principal Nameを紐付けます。また、Keytabファイルを生成します。
下記の表の通りに設定しております。
| 設定項目 | 設定値 | 備考 |
|---|---|---|
| Service Principal Name | HTTP/bigip01.lab.test@LAB.TEST | |
| Keytabファイルの出力先 | C:\bigip01.keytab |
setspn -A HTTP/bigip01.lab.test@LAB.TEST bigip01

setspn -L bigip01

ktpass -princ HTTP/bigip01.lab.test@LAB.TEST -mapuser bigip01@lab.test -pass 'Change_Pa$$w0rd' -ptype KRB5_NT_PRINCIPAL -out C:\bigip01.keytab -mapop set

dir C:\bigip01.keytab

Keytabファイルの確認
先の手順にて C:\ ドライブ直下に出力先を指定していたため、Explorerで C:\ ドライブ直下にKeytabファイルが出力されているか確認します。
-
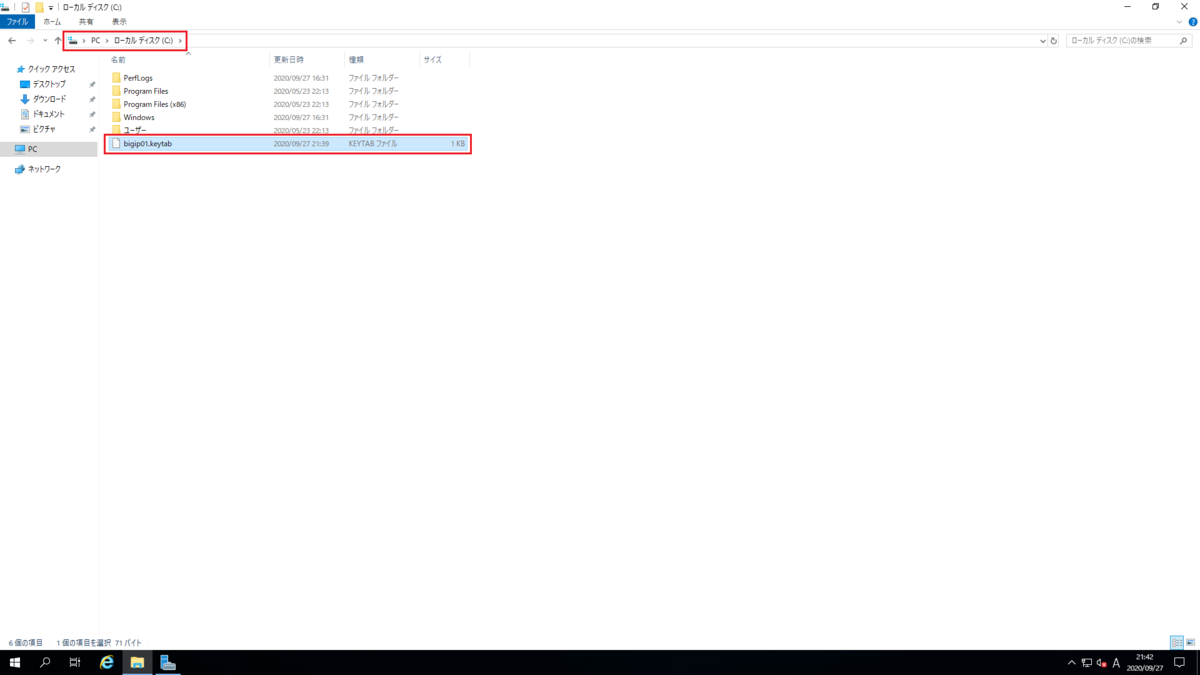
Keytabファイル
BIG-IP側の作業
本記事では主にWeb UIよりBIG-IPの設定を行います。 理由としては、Visual Policy Editor (VPE) による設定をCLIで代替するのが難しいためです。
DNS設定変更
BIG-IPでKerberos認証を行うにあたり、 Active Directory 兼 DNSサーバとなっているWindows Server 2019のIPアドレスにDNSの名前解決先を向けます。
- Web UI
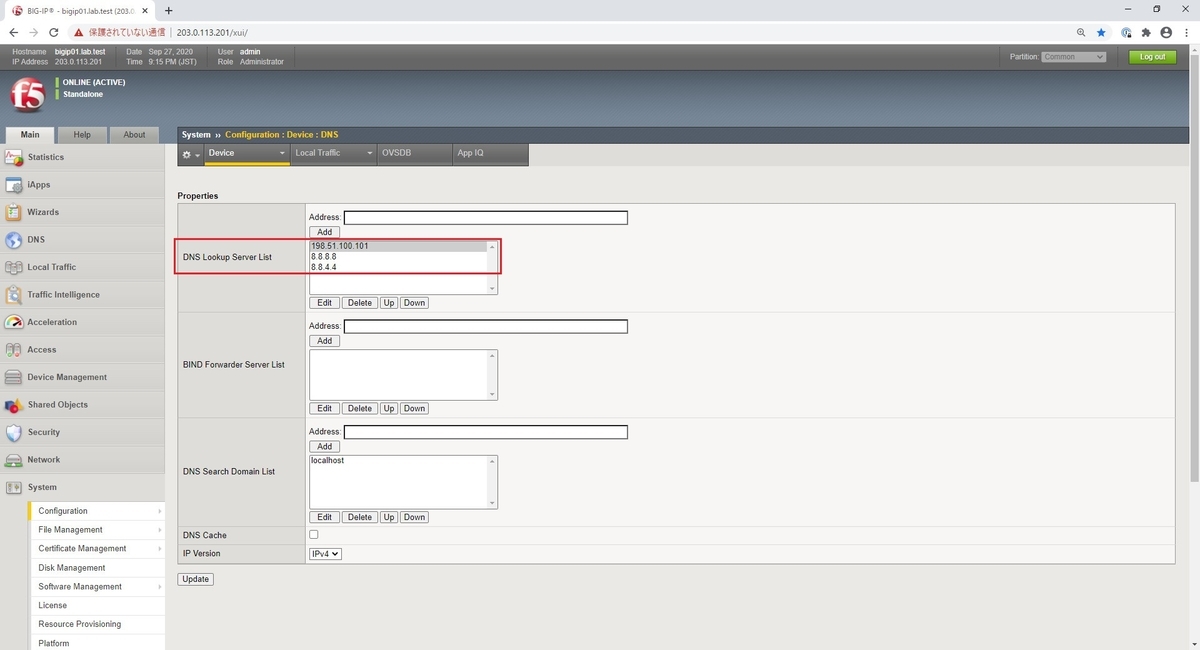
Web UI にて System > Configuration > Device > DNS の DNS Lookup Server List にIPアドレスを追加(Add)して、Up ボタンと Down ボタンを使って並び替えて最優先にさせます。
筆者の環境の例ではIPアドレスは198.51.100.101となります。
筆者は検証の度にWindows Server 2019の再構築を行う可能性があるので、元々設定していたGoogle Public DNS(8.8.8.8,8.8.4.4)の設定は残しています。
Kerberos認証の設定
本項目は、APMできめ細かなアクセス制御を行うための Visual Policy Editor (VPE) から参照される設定になります。
Web UI
Web UI では Access > Authentication > Kerberos より下記の表の設定に相当します。設定項目 設定値 備考 Name Kerberos_Auth 任意の名称を指定します。 SNP Format Kerberos 5 NT Principal Service Principal Name HTTP/bigip01.lab.test@LAB.TEST Active Directoryのユーザーに紐付けたService Principal Nameを指定します。 Keytab File 先に作成済みの bigip01.keytabをアップロードします。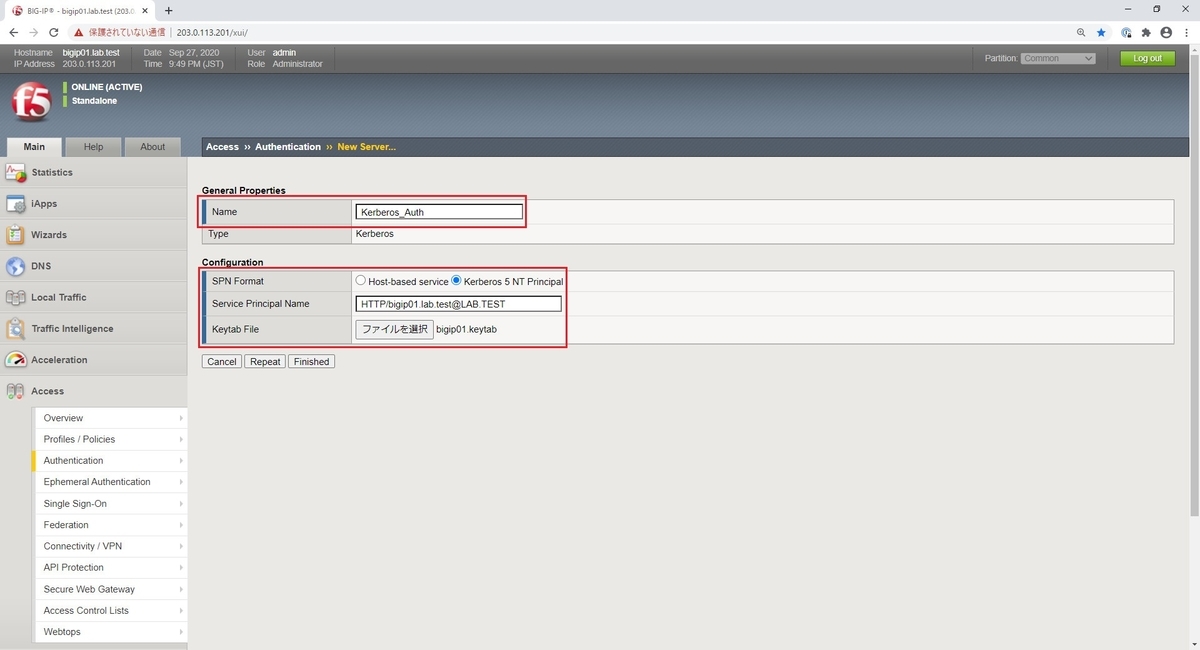
Access > Authentication > Kerberos
BIG-IP自体からActive Directoryサーバへの接続確認
Kerberos認証ではBIG-IPとActive Directoryと接続性が必要になるため、接続確認を行っておきます。
CLI
adtestコマンドのオプションの引数を下記の表の通りに指定して、問い合わせ(query)を実行しています。設定項目 設定値 備考 -t <test type>query テストの種類を選びます。変更操作を避けるために query を指定します。 -r <domain_name>LAB.TEST Realm を指定します。 -A <admin_name>Administrator Active Directoryの管理者アカウントを指定します。 -W <admin_pass>Change_Pa$$w0rd 管理者アカウントのパスワードを指定します。適宜、パスワードを修正してください。本記事では検証環境のためパスワードを直接記載していますが、本番環境では -Wオプションを省略し、手打ち入力での実行を検討してください。-u <user_name>bigip01 Active Directoryのユーザーを指定します。 -d <num>1 0: デフォルト, 1: 冗長表示(Verbose)
adtest -t query -r "LAB.TEST" -A Administrator -W 'Change_Pa$$w0rd' -u bigip01 -d 1
adtest コマンドに引数を渡さなければ、使い方が表示されます。
[root@bigip01:Active:Standalone] config # adtest
usage: adtest [options]
    -t <auth|query|chgpswd|join|chgmpswd|groups>        test type [auth|query|chgpswd|join|chgmpswd|groups]
    -n <num>            test number [default: 1]
    -c <num>            concurrency [default: 1] maximum 100 threads
    -d <num>            debug [default: 0]
    -T                  timing
    -r <domain_name>    realm
    -h <kdc_name>       hostname
    -A <admin_name>     adminName
    -W <admin_pass>     adminPassword
    -f <filter>         filter [default: 'sAMAccountName=<userName>']
    -F <filename>                filename. This option is required to dump all domain groups with test type 'groups'
    -C <cache_root>     credential cache file root [default: '/tmp']
    -u <user_name>      userName
    -M <machine_name>   machineName
    -O <operating_system_name>  operatingSystemName
    -V <operating_system_version        operatingSystemVersion
    -E <machine_description>    machineDescription
    -D <user_domain>    userDomain
    -w <user_pass>      userPassword
    -N <new_pass>       newPassword
    -a <enc_type>       include pre-authentication data. Allowed  enc_type values: rc4-hmac | des-cbc-crc | des-cbc-md5 | aes128 | aes256
    -s                   check new password against domain password policies
    -g                  fetch primary group
    -G                  fetch nested groups
    -P                  fetch password expiration time
    -U                  cross-realm support (UPN enable)
examples:
    adtest -t auth -r "siterequest.com" -u user1 -w 123456
    adtest -t auth -r "siterequest.com" -U true -u user1 -D user.domain.com -w 123456
    adtest -t auth -h "host.siterequest.com" -r "siterequest.com" -u user1 -w 123456
    adtest -t query -h "host.siterequest.com" -r "siterequest.com" -A Administrator -W password1\!a -u user1
    adtest -t query -h "host.siterequest.com" -r "siterequest.com" -A Administrator -W password1\!a -g -G -u user1
    adtest -t query -h "host.siterequest.com" -r "siterequest.com" -A Administrator -W password1\!a -u user1 -D user.domain.com
    adtest -t chgpswd -h "host.siterequest.com" -r "siterequest.com" -u user1 -w 123456 -N abcdef
    adtest -t join -h "host.siterequest.com" -r "siterequest.com" -A Administrator -W password1\!a -M myserver -O TMOS -V 11.3.0 -E BIG-IP
    adtest -t chgmpswd -h "host.siterequest.com" -r "siterequest.com" -M myserver -w machineAccountPassword
[root@bigip01:Active:Standalone] config #
adtest コマンドの実行例は下記の通りです。
本コマンドの最終行を参照すると Test done: total tests: 1, success=1, failure=0 とあるのでコマンドの実行に成功(success=1)しています。
また、userPrincipalName: HTTP/bigip01.lab.test@LAB.TEST の出力より、設定したService Principal Nameが表示されているのを確認できます。
[root@bigip01:Active:Standalone] config # adtest -t query -r "LAB.TEST" -A Administrator -W 'Change_Pa$$w0rd' -u bigip01 -d 1
Using the following server settings:
domain name = 'LAB.TEST'
domain controller = ''
admin name = 'Administrator'
admin password = ******
PADATA encryption type =
none
Other settings specified for the test:
test type: AD Query
userName: bigip01
filter: (sAMAccountName=bigip01)
fetch group: false
nested groups: false
fetch PSO: false
cross-realm support: false
concurrency: 1
CCache file root: /var/run/apmd/krb5cc
output file:
urlDecoded: 0
thread 0 started
__process_dbg_msg:verifyKrb5Cache(): No credentials cache found (filename: /var/run/apmd/krb5cc/ADTest/krb5cc_0), func=krb5_cc_get_principal, ccname=/var/run/apmd/krb5cc/ADTest/krb5cc_0
locateKDC:Domain Controller is not specified for domain 'LAB.TEST', KDCs will be discovered using DNS
locateKDC:Adding 'winsv2019-01.lab.test' to KDC list
initDnsServer:Using '127.0.0.1' as a Name Server
authenticate:authenticate with 'Administrator' successfully
locateKDC:Domain Controller is not specified for domain 'LAB.TEST', KDCs will be discovered using DNS
locateKDC:Adding 'winsv2019-01.lab.test' to KDC list
initDnsServer:Using '127.0.0.1' as a Name Server
queryActiveDirectoryAttrs:ldap_search_ext_s: return code: Success (0)
queryActiveDirectoryAttrs:ldap_search_ext_s() successful. base: dc=LAB,dc=TEST, scope: 2, filter: '(sAMAccountName=bigip01)'
queryActiveDirectory:query with '(sAMAccountName=bigip01)' successfully
accountExpires: 9223372036854775807
badPasswordTime: 132456949306174470
badPwdCount: 4
cn: bigip01
codePage: 0
countryCode: 0
dSCorePropagationData: 16010101000000.0Z
distinguishedName: CN=bigip01,CN=Users,DC=lab,DC=test
dn: CN=bigip01,CN=Users,DC=lab,DC=test
instanceType: 4
lastLogoff: 0
lastLogon: 0
logonCount: 0
name: bigip01
objectCategory: CN=Person,CN=Schema,CN=Configuration,DC=lab,DC=test
objectClass: | top | person | organizationalPerson | user |
objectGUID: 臆S雇A額~\|m胼
objectSid:
primaryGroupID: 513
pwdLastSet: 132456839738202920
sAMAccountName: bigip01
sAMAccountType: 805306368
servicePrincipalName: HTTP/bigip01.lab.test
uSNChanged: 20607
uSNCreated: 20598
userAccountControl: 512
userPrincipalName: HTTP/bigip01.lab.test@LAB.TEST
whenChanged: 20200927123933.0Z
whenCreated: 20200927123102.0Z
thrd_id[0]: succ_cnt=1, fail_cnt=0
Test done: total tests: 1, success=1, failure=0
[root@bigip01:Active:Standalone] config #
Per-Session Policyの作成
Web UI
Web UI の Access > Profiles / Policies > Access Profiles (Per-Session Policies) より下記の表の通りに設定します。設定項目 設定値 備考 Name Kerberos_Auth_Per-Session_Policy 任意の名称を指定します。 Profile Type SWG-Explicit Language English (en) , Japanese (ja) Default Language Japanese (ja) 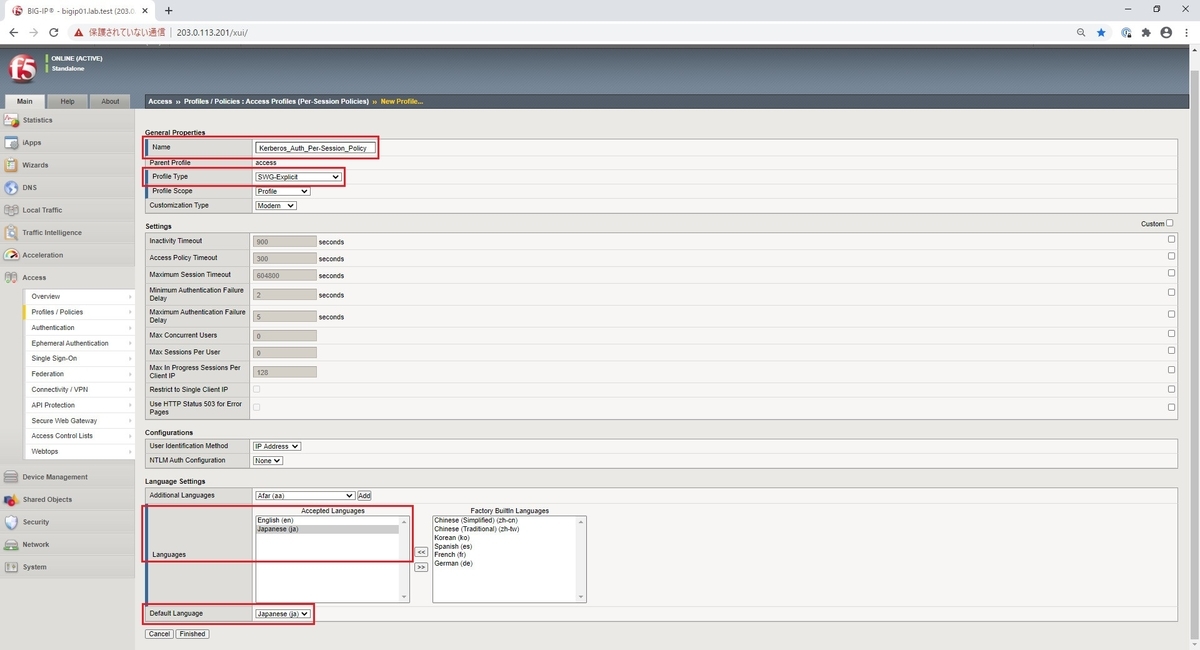
Access > Profiles / Policies > Access Profiles (Per-Session Policies) #1 (全体) 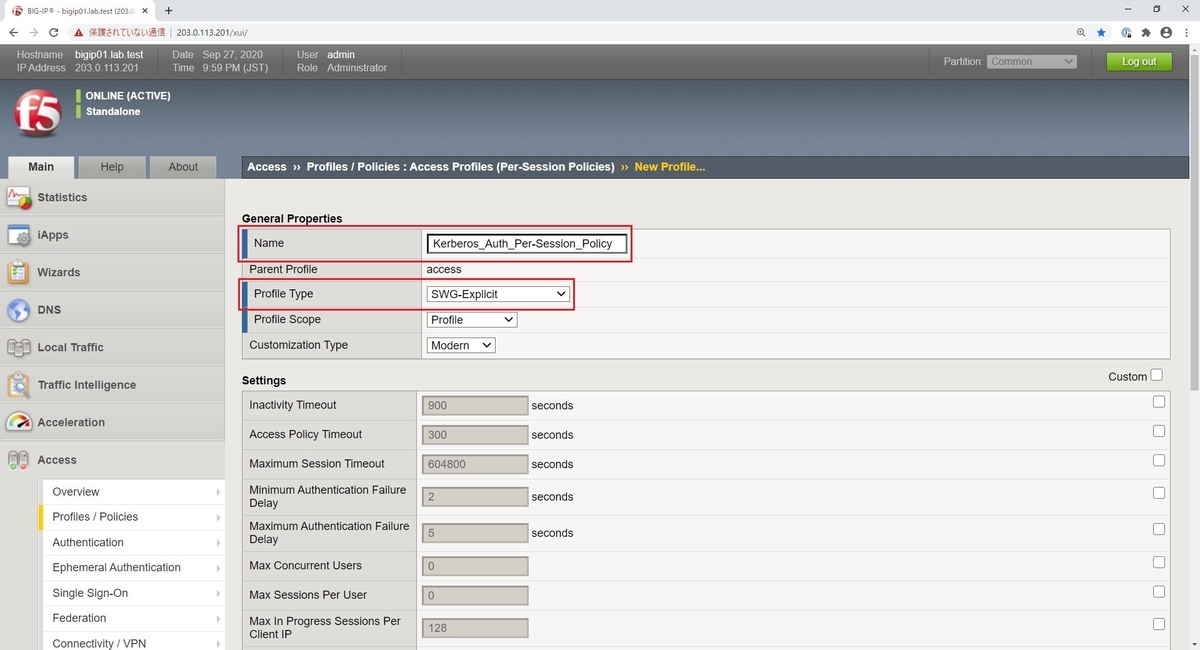
Access > Profiles / Policies > Access Profiles (Per-Session Policies) #2 (拡大) 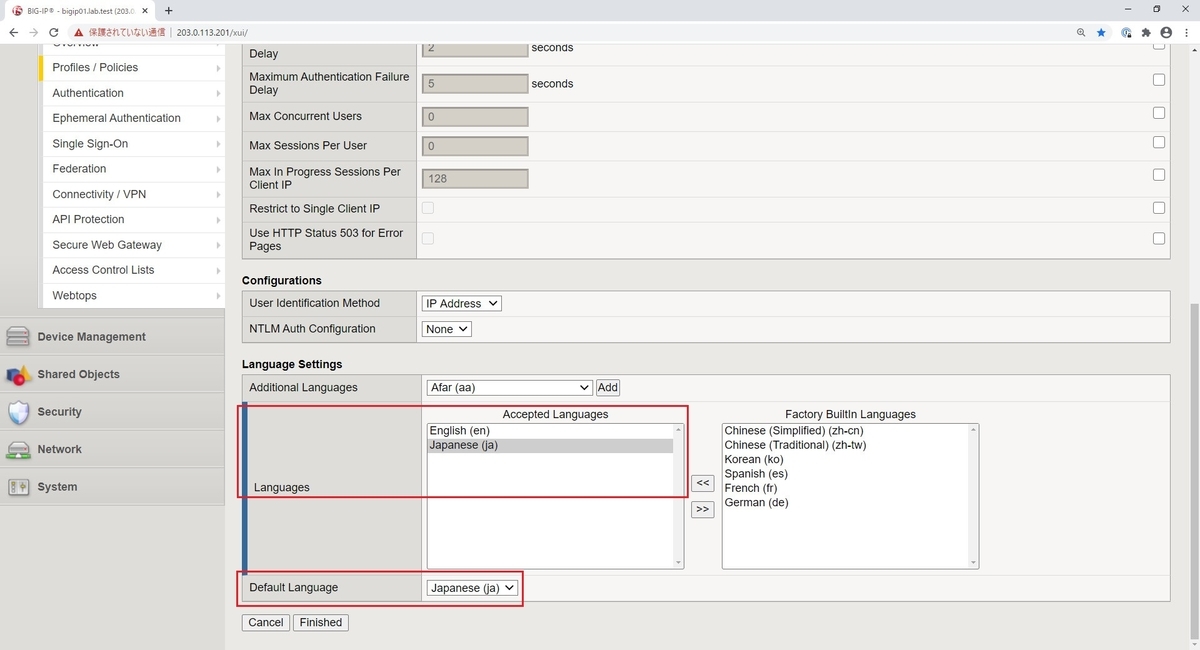
Access > Profiles / Policies > Access Profiles (Per-Session Policies) #2 (拡大)
Visual Policy Editor (VPE)による設定
Web UI
Web UI の Access > Profiles / Policies > Access Profiles (Per-Session Policies) より、 先に作成済みのPer-Session Policyの Edit ... ボタンをクリックして Visual Policy Editor (VPE) を起動します。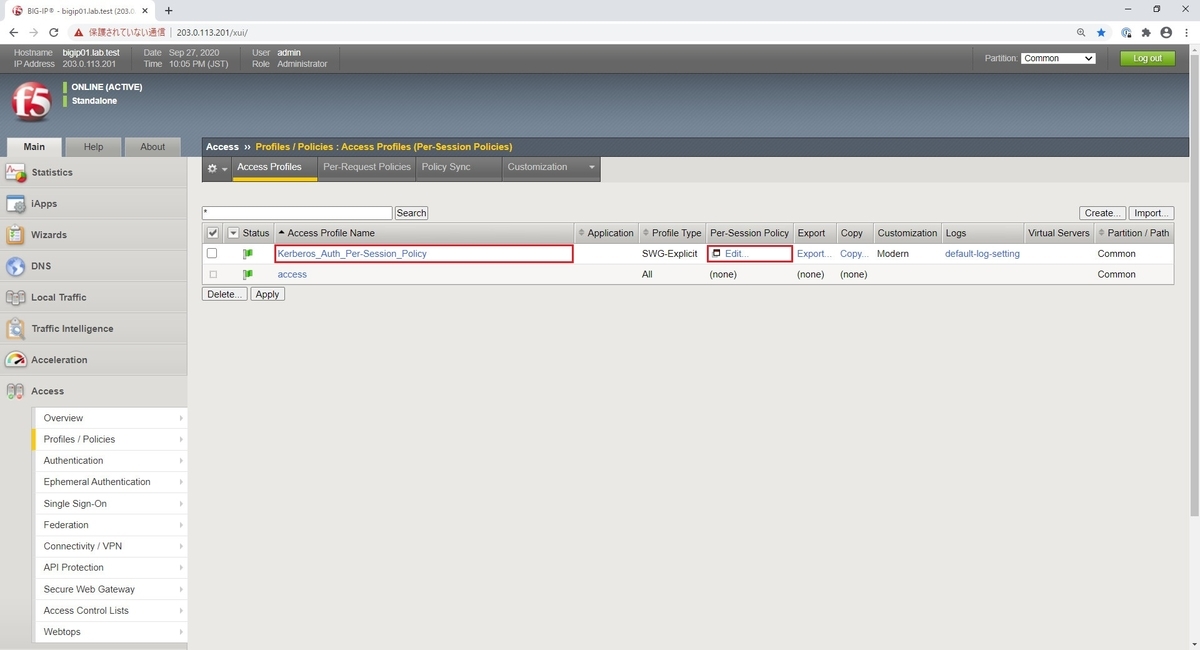
Visual Policy Editorの起動
Per-Session Policyの初期状態
Web UI
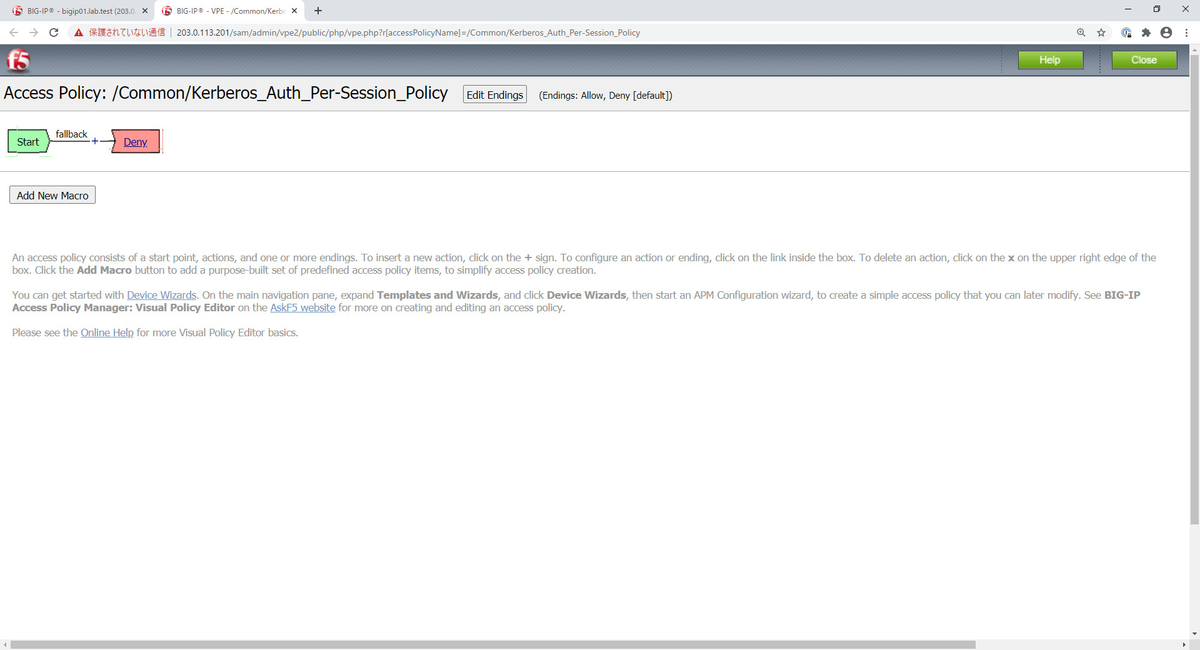
Per-Session Policyの初期状態
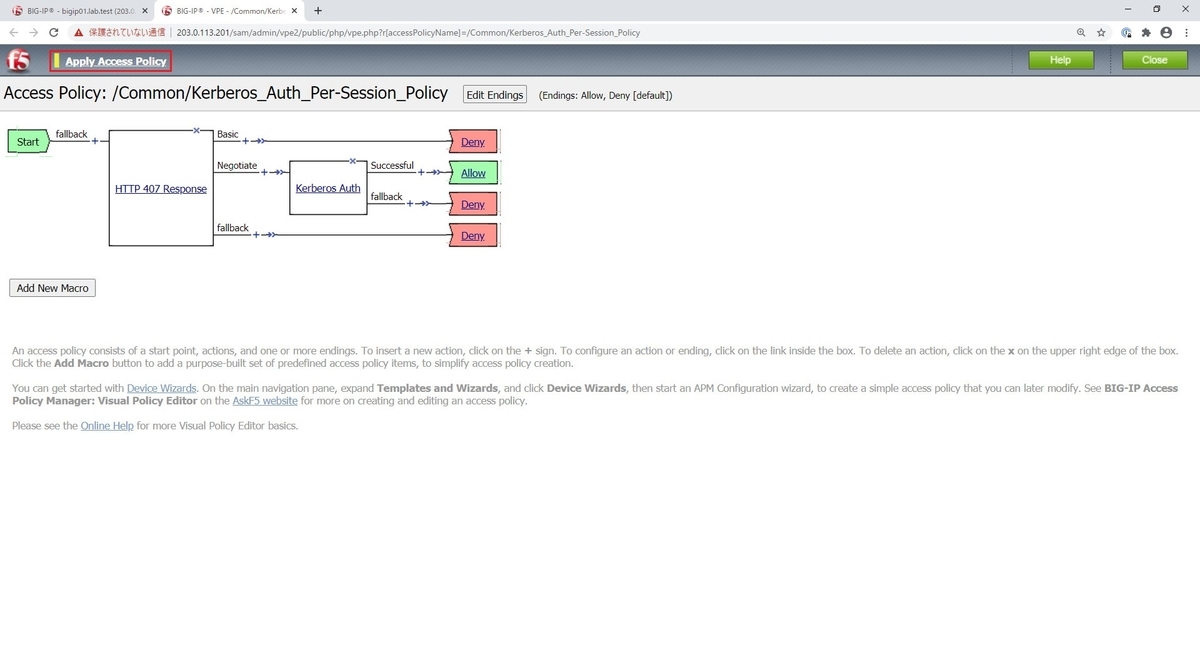
Per-Session Policyの最終形
Web UI
HTTP 407 Response と Kerberos Auth のItemを用いてKerberos認証を行います。
Explicit Forward ProxyがKerberos認証を行うにあたりユーザーからの接続要求に対して 407 Proxy Authentication を応答するため、 Kerberos AuthのItemの前段にHTTP 407 Response のItemが必要になります。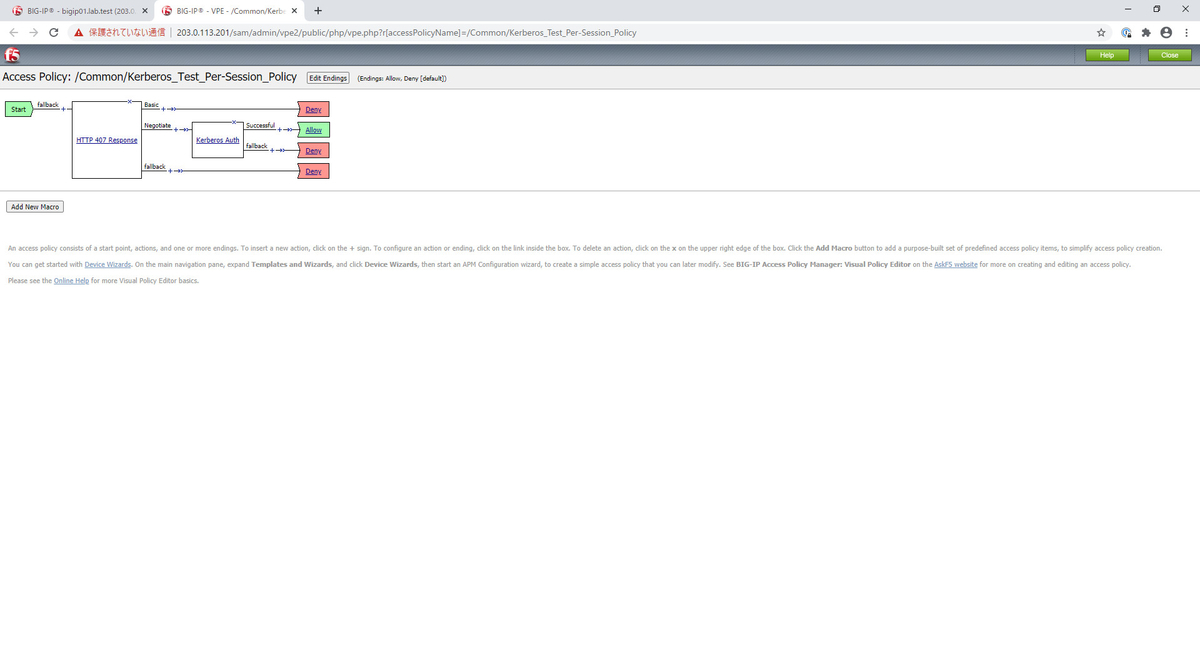
Per-Session Policyの最終形
HTTP 407 Response
Web UI
Per-Session Policyの最終形を参考にして、Itemの Logon タブの中より HTTP 407 Response のItemを追加します。
また、追加した HTTP 407 Response に対して下記の表の通りに設定します。補足ですが、HTTP 407 Response のItemはBASIC認証にも使用されます。設定項目 設定値 備考 Name HTTP 407 Response 任意の名称を指定します。本記事ではデフォルトの名称にしております。 HTTP Auth Level negotiate Kerberosによる認証を行うために negotiate を選択します。 Language ja 任意で ja を選択し、日本語化します。 
HTTP 407 Response #1 
HTTP 407 Response #2
Kerberos Auth
Web UI
Per-Session Policyの最終形を参考にして、Itemの Authentication タブの中より Kerberos Auth のItemを追加します。
また、追加した Kerberos Auth に対して下記の表の通りに設定します。設定項目 設定値 備考 Name Kerberos Auth 任意の名称を指定します。本記事ではデフォルトの名称にしております。 AAA Server /Common/Kerberos_Auth 先の Kerberos認証の設定で作成済みの設定を指定します。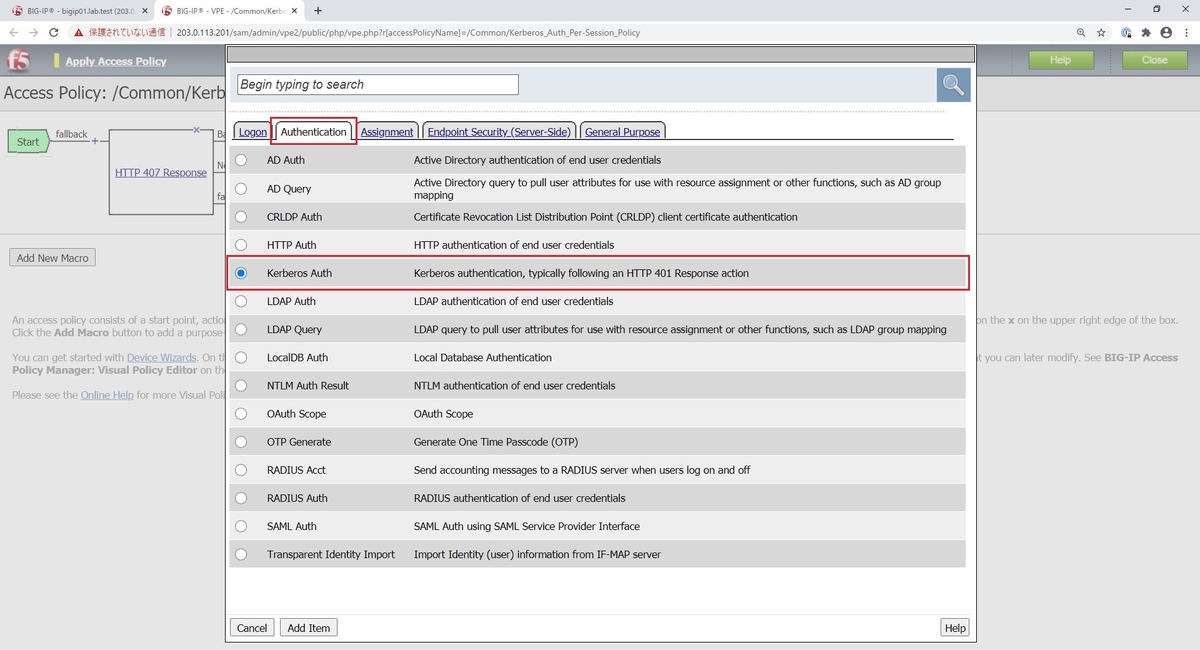
Kerberos Auth #1 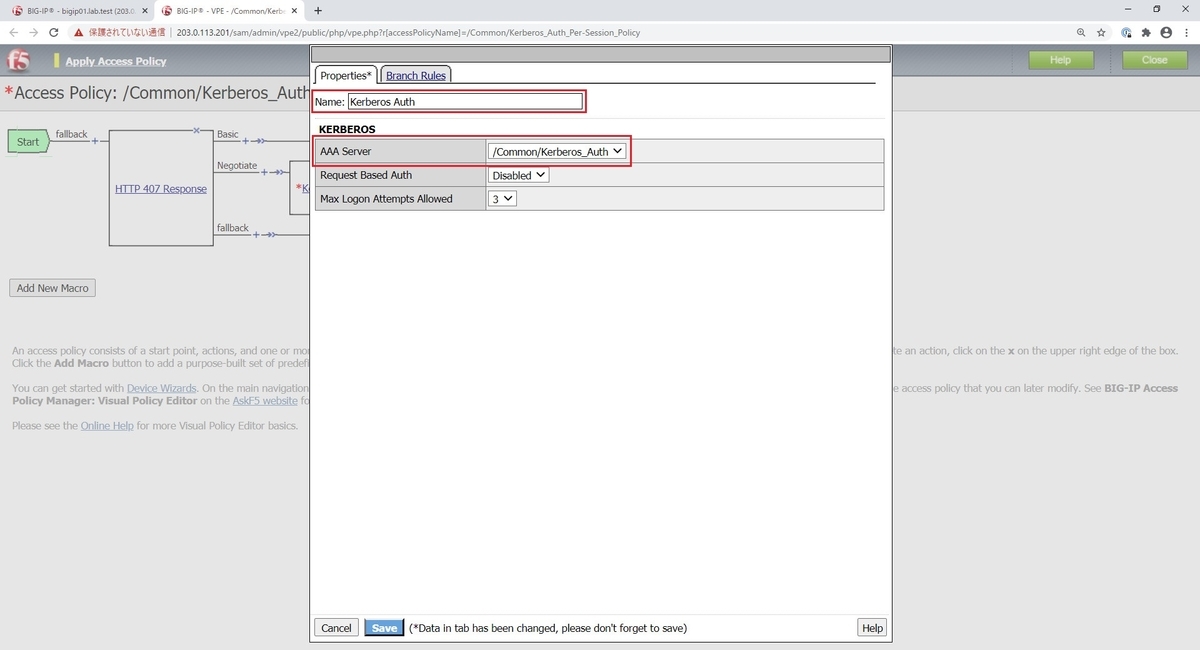
Kerberos Auth #2
Ending
Web UI
Kerberos AuthのSuccessfulの右側にあるEndingの Deny を Allow に修正します。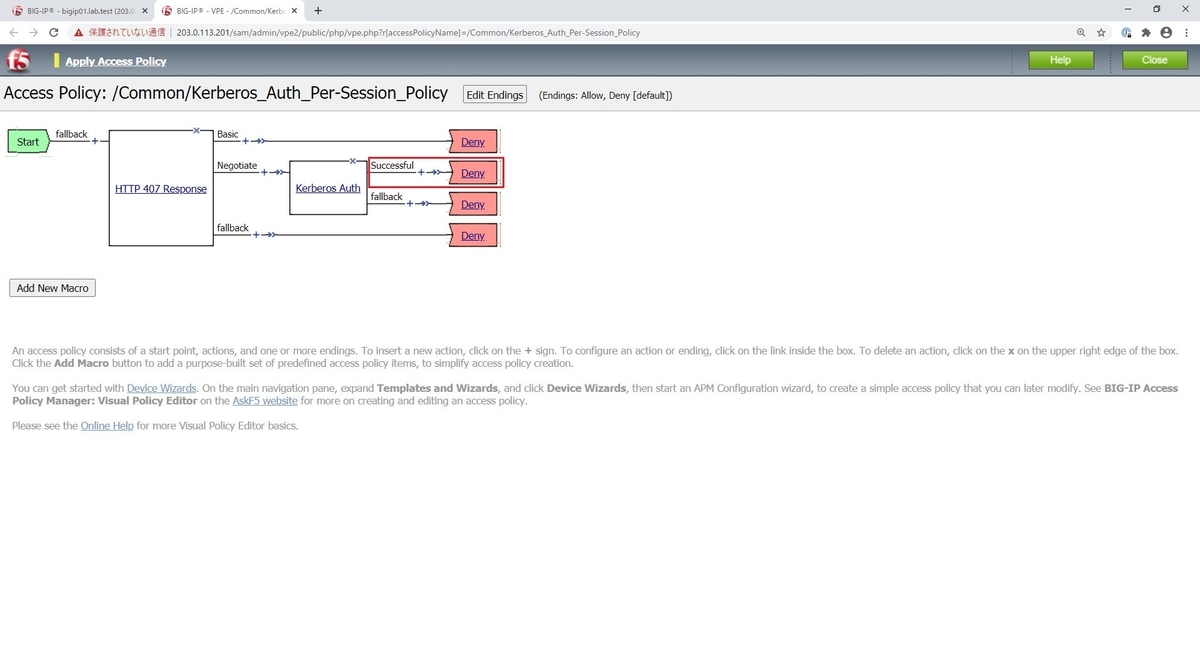
Endingの設定変更前 (Before) 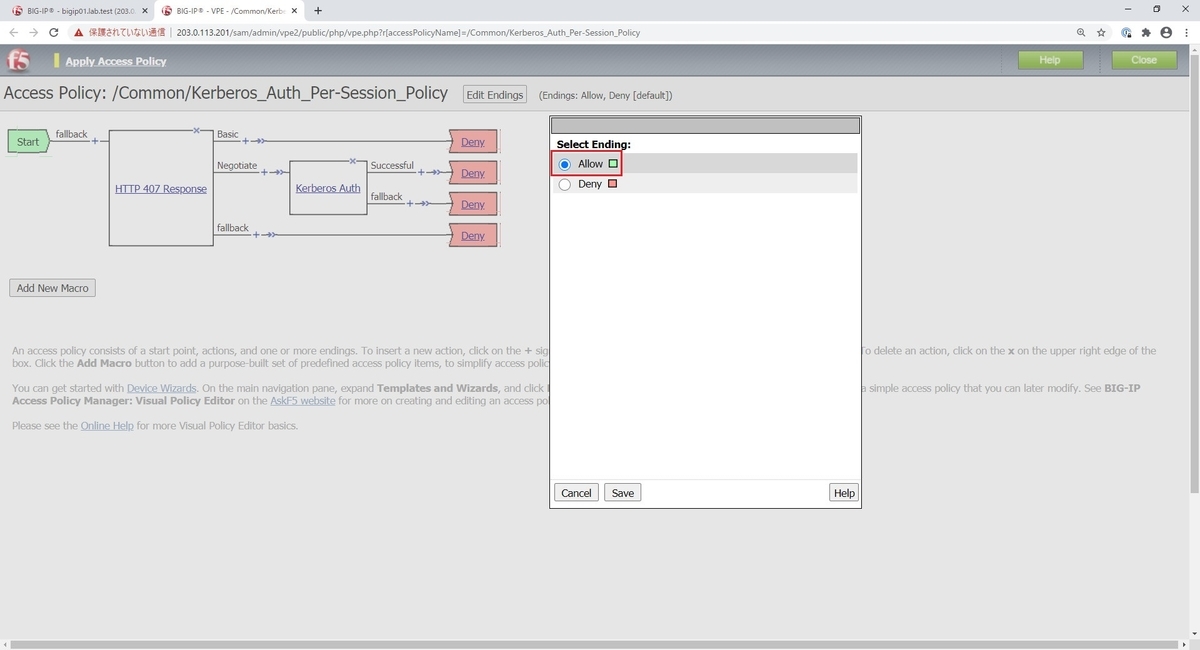
DenyからAllowに修正 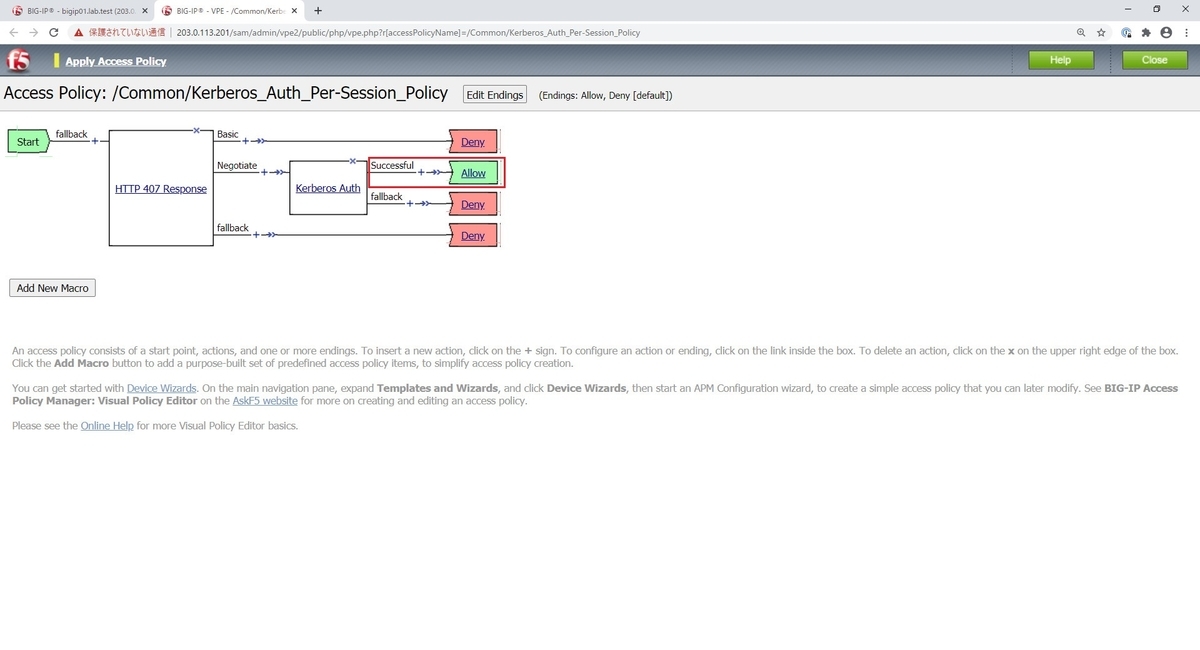
Endingの設定変更後 (After)
Apply Access Policy
Virtual ServerへのPer-Session Policyの適用
Access Profile
Web UI
HTTP Forward Proxy のVirtual Serverの設定より Access Profile に先ほど作成したPer-Session Policyを適用します。
筆者の環境では、HTTP Forward ProxyのVS_HTTP_FORWARD_PROXYに Kerberos_Auth_Per-Session_Policy を適用しています。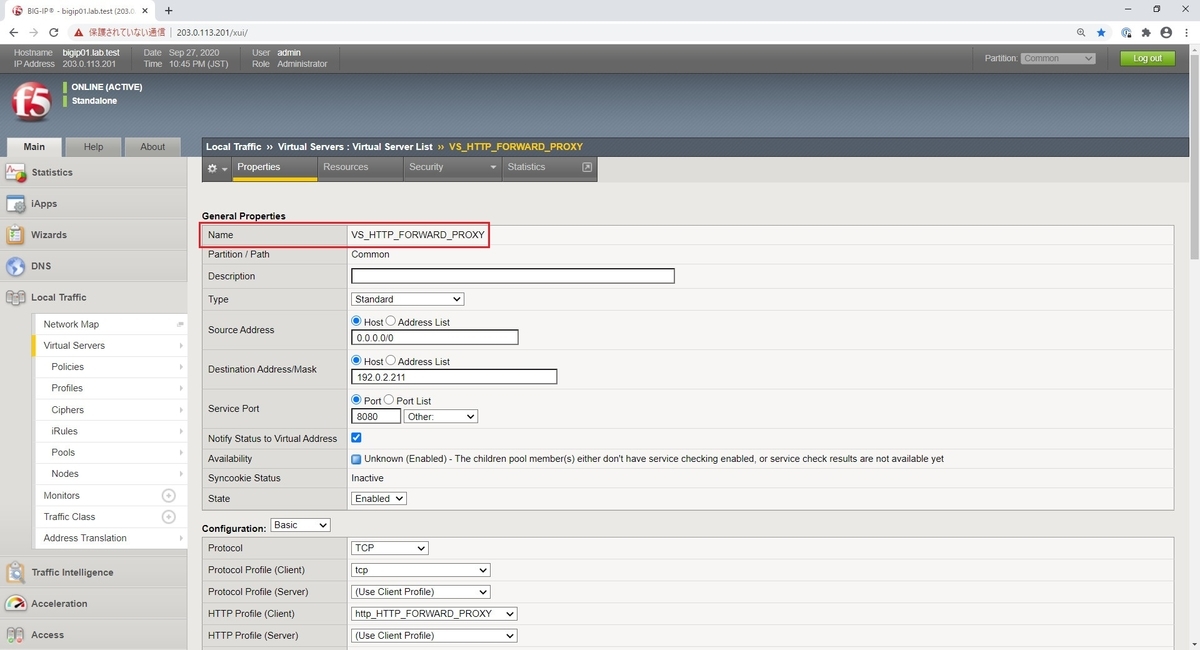
Virtual ServerへのPer-Session Policyの適用 #1 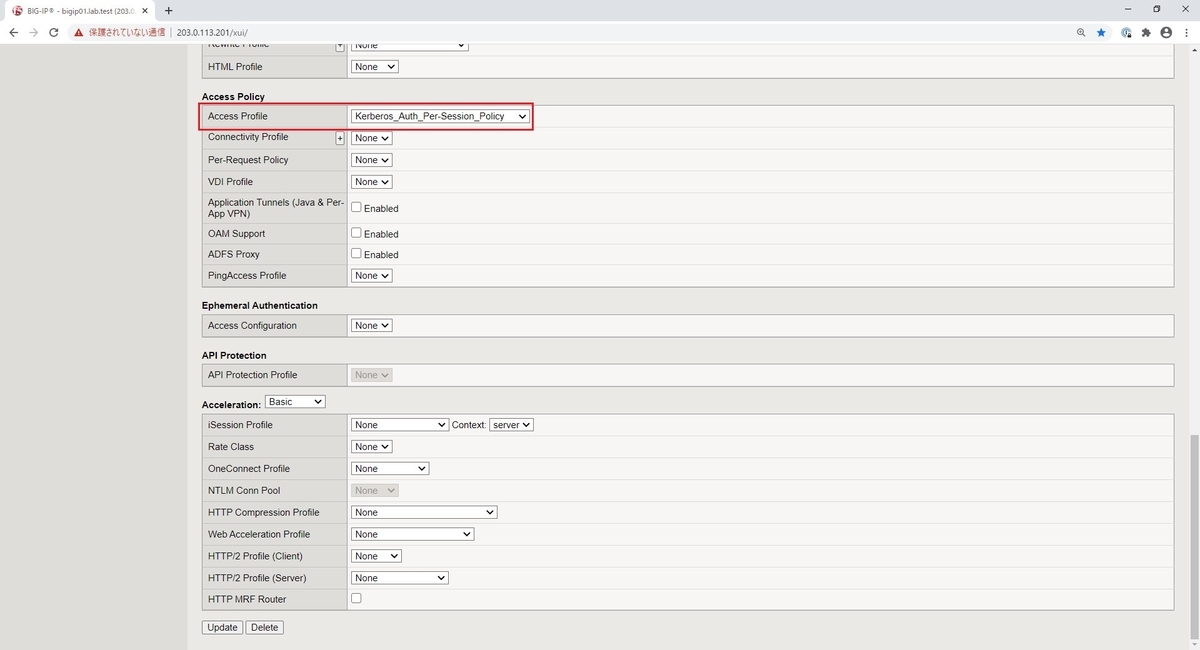
Virtual ServerへのPer-Session Policyの適用 #2
Windows 10側の作業
Proxyの設定例
Windows環境のProxy設定には幾つか方法がありますが、本記事では簡潔な手順とするためにクライアントOSであるWindows 10側で手動で設定を行います。
GUI Kerberos認証を行うためには、ProxyサーバのアドレスをService Principal NameのFQDN部分と同じに指定します
例えば、本記事では Service Principal Name がHTTP/bigip01.lab.test@LAB.TESTであるためbigip01.lab.testと指定します。設定項目 設定値 備考 アドレス bigip01.lab.test Service Principal NameのFQDN部分を指定します。 ポート 8080 HTTP Forward ProxyのVirtual Serverの待ち受けポートを指定します。 
Windows 10のProxy設定例 #1 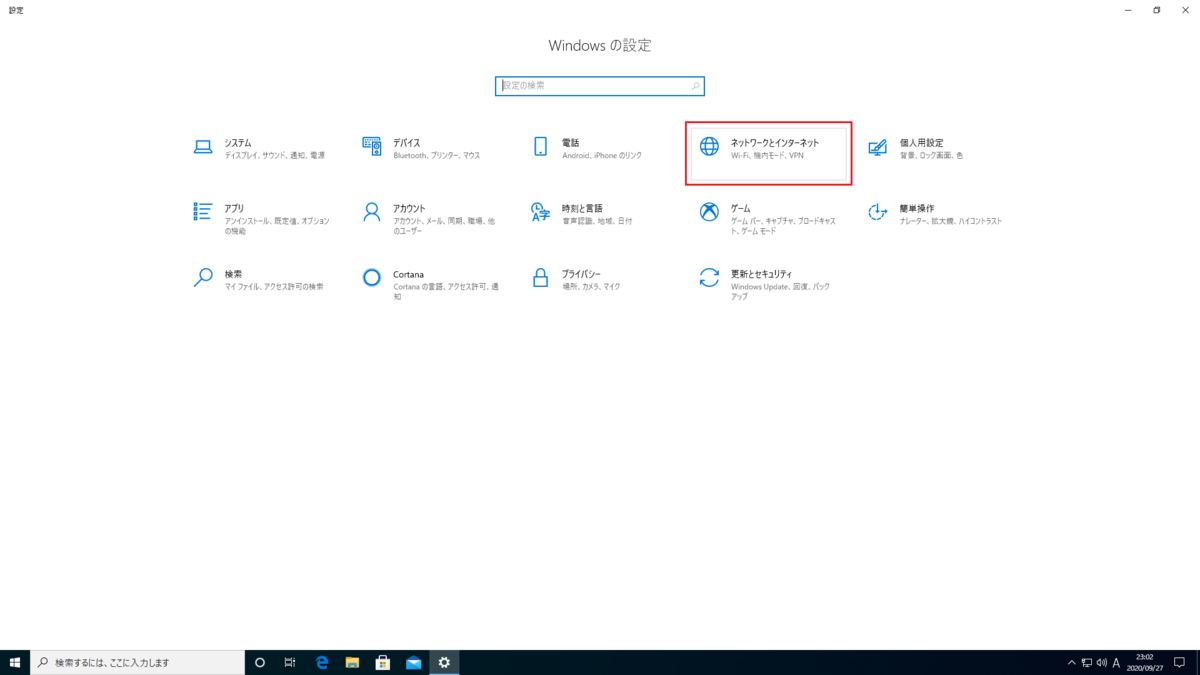
Windows 10のProxy設定例 #2 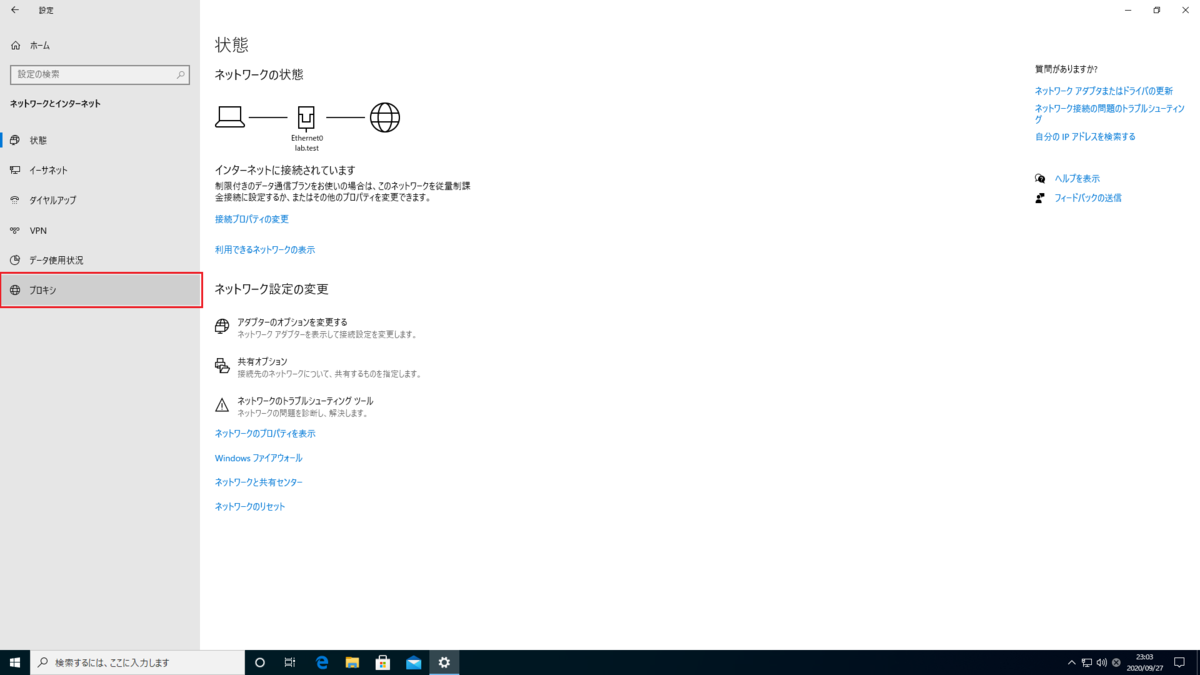
Windows 10のProxy設定例 #3 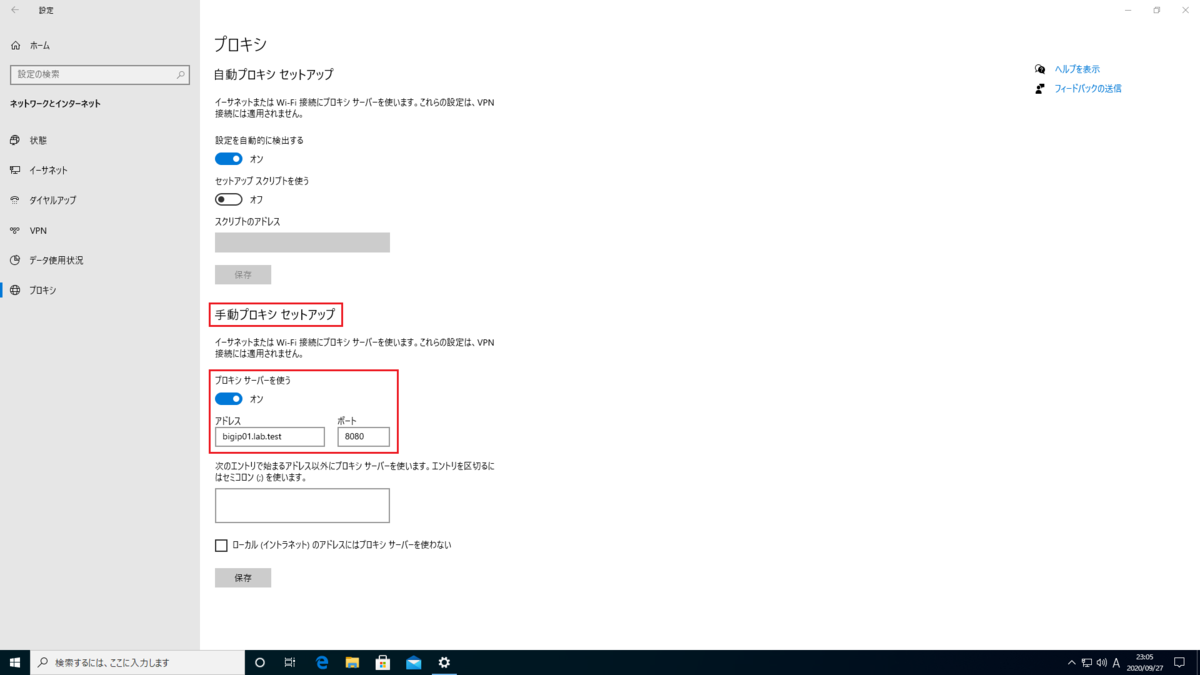
Windows 10のProxy設定例 #4
疎通確認
HTTP Forward ProxyとSSL Forward Proxyの2つの観点で疎通確認を行います。
本記事では下記の接続先に対して疎通確認を行っています。
| 設定項目 | 設定値 | 備考 |
|---|---|---|
| HTTP(80/tcp) | http://www.example.com/ | |
| HTTPS(443/tcp) | https://www.example.com/ |
HTTP(80/TCP) 接続による疎通確認
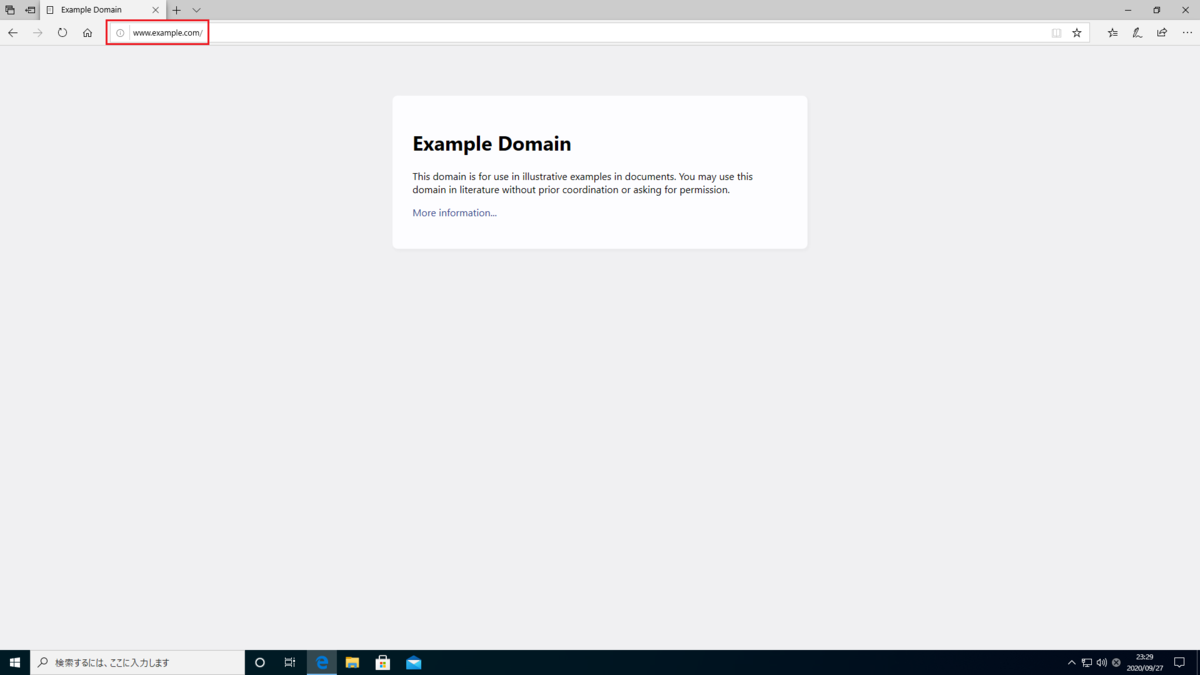
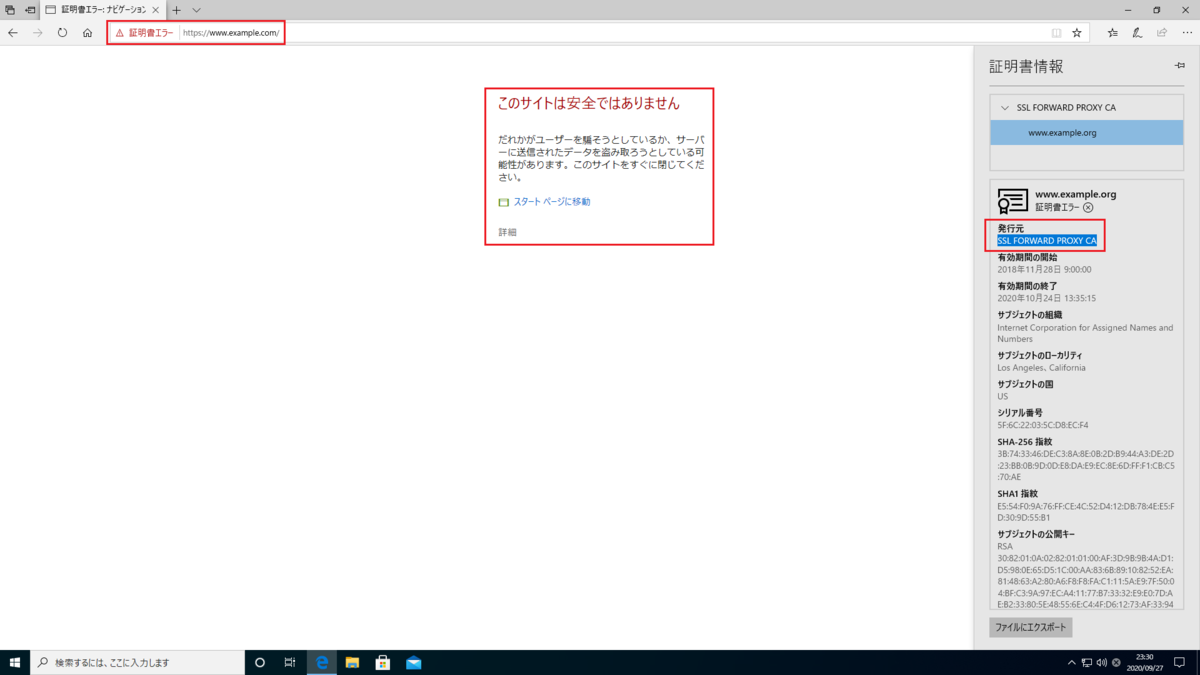
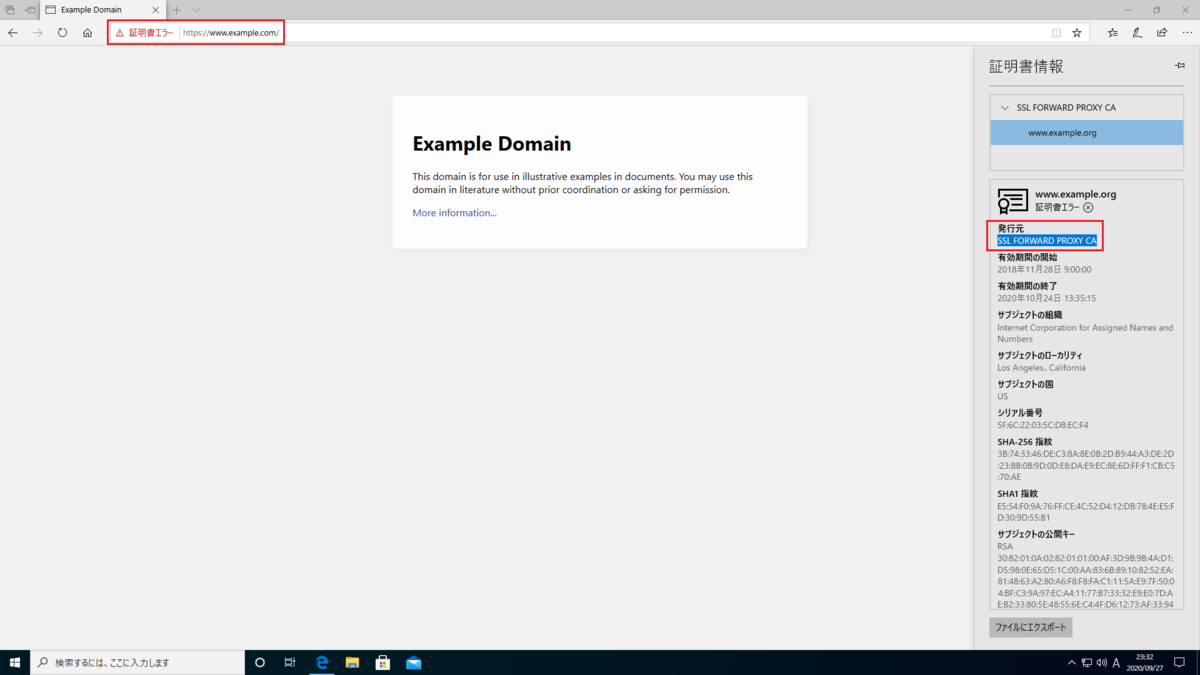
HTTP(80/TCP) 接続による疎通確認 HTTPS(443/tcp) 接続による疎通確認 SSL Forward ProxyによりSSL通信のInterceptを行っているためSSL証明書の警告が表示されるのを確認できます。
BIG-IP側での状態確認
Web UI Web UI にて Access >Overview > Active Sessions を表示します。
Session ID と Variables をクリックするとそれぞれの状態と確認できます。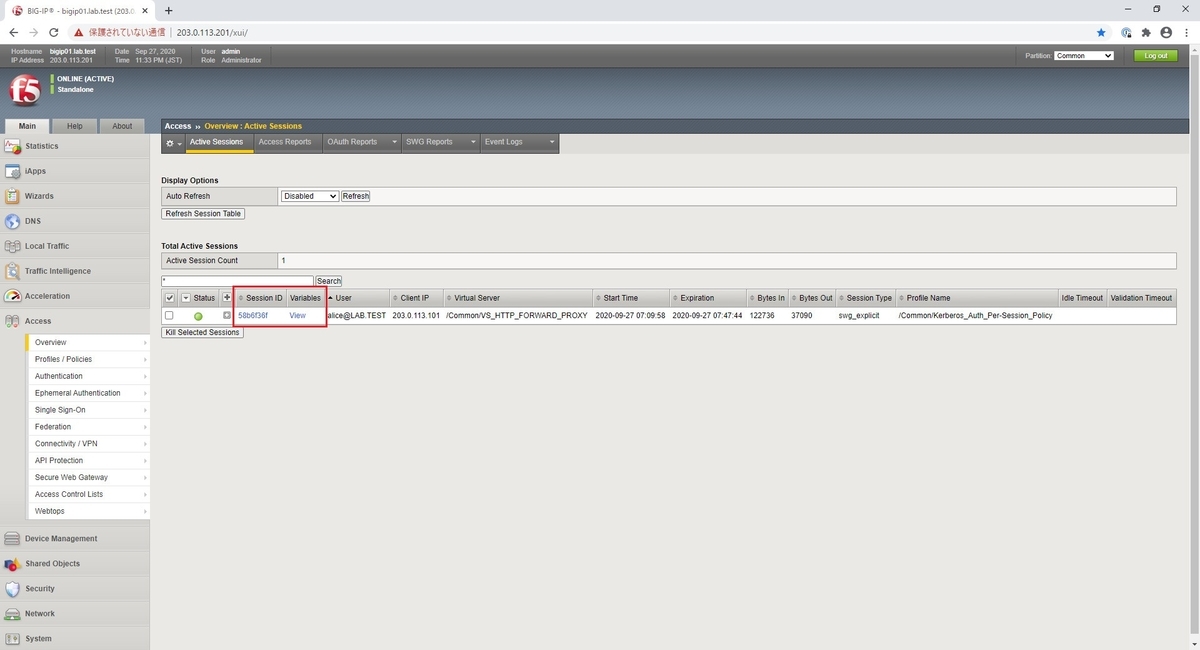
Access >Overview > Active Sessions 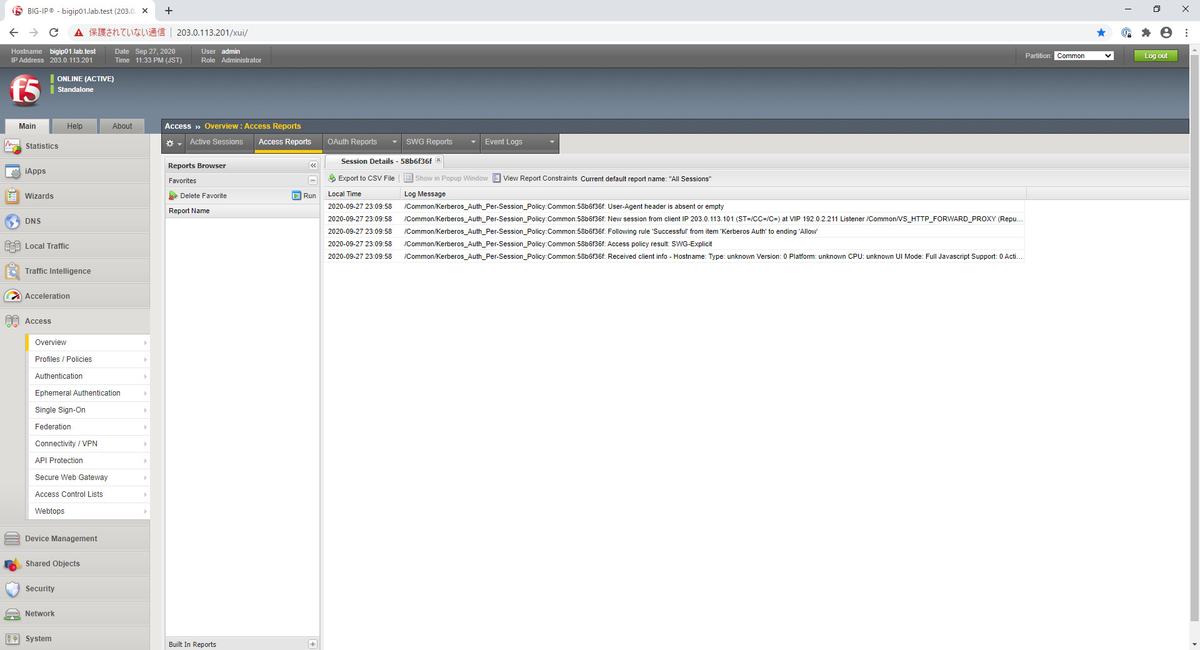
Session ID 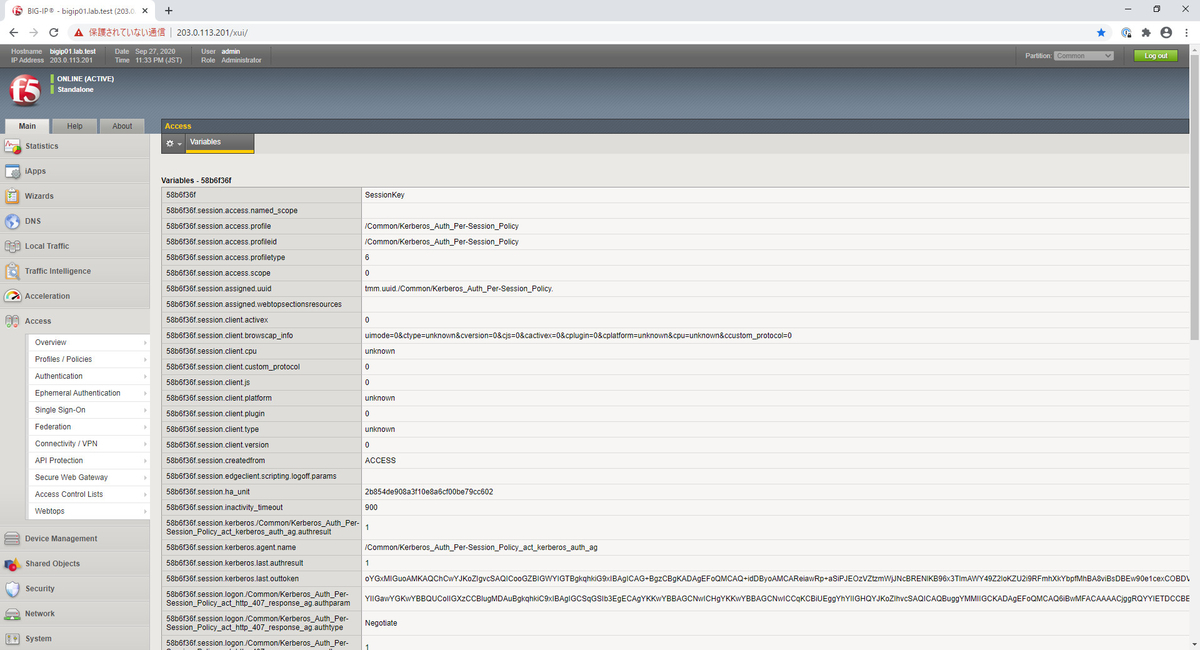
Variables
tail -n 0 -f /var/log/apm
下記はログの出力例になります。
[root@bigip01:Active:Standalone] config # tail -n 0 -f /var/log/apm
Sep 27 23:46:55 bigip01 notice tmm1[17814]: 01490506:5: /Common/Kerberos_Auth_Per-Session_Policy:Common:074bf126: Received User-Agent header: Mozilla%2F5.0%20(Windows%20NT%2010.0%3B%20Win64%3B%20x64%3B%20ServiceUI%2014)%20AppleWebKit%2F537.36%20(KHTML%2C%20like%20Gecko)%20Chrome%2F70.0.3538.102%20Safari%2F537.36%20Edge%2F18.18363.
Sep 27 23:46:55 bigip01 notice tmm1[17814]: 01490500:5: /Common/Kerberos_Auth_Per-Session_Policy:Common:074bf126: New session from client IP 203.0.113.101 (ST=/CC=/C=) at VIP 192.0.2.211 Listener /Common/VS_HTTP_FORWARD_PROXY (Reputation=Unknown)
Sep 27 23:46:55 bigip01 notice apmd[12403]: 01490005:5: /Common/Kerberos_Auth_Per-Session_Policy:Common:074bf126: Following rule 'Successful' from item 'Kerberos Auth' to ending 'Allow'
Sep 27 23:46:55 bigip01 notice apmd[12403]: 01490102:5: /Common/Kerberos_Auth_Per-Session_Policy:Common:074bf126: Access policy result: SWG-Explicit
Sep 27 23:46:55 bigip01 notice apmd[12403]: 01490248:5: /Common/Kerberos_Auth_Per-Session_Policy:Common:074bf126: Received client info - Hostname:  Type: Edge Version: 12 Platform: Win10 CPU: x64 UI Mode: Full Javascript Support: 1 ActiveX Support: 0 Plugin Support: 0
^C
[root@bigip01:Active:Standalone] config #
最後に
必要に応じて仮想マシンのスナップショットを取得したり、UCSファイルのバックアップを取得して、本構成の状態に戻しやすくします。
なお、ホスト名_YYYYMMDD_HHMM の命名規則で UCS ファイルを取得する場合は次のようになります。
tmsh list sys ucs

echo ${HOSTNAME}_`date +%Y%m%d`_`date +%H%M`

tmsh save sys ucs ${HOSTNAME}_`date +%Y%m%d`_`date +%H%M`

tmsh list sys ucs
